
Please welcome my special guest today, Emily from Chatting at the Sky! I met Emily when we, along with her sister Nester and Sandy from Reluctant Entertainer, all roomed together at Blissdom this year. What a treat to have been able to spend some time with her in real life! She is such a sweetie, I love her heart.
Emily has a beautiful home and yet more importantly, she has a beautiful life to go along with that home! I am so excited that she is here at The Inspired Room!
Welcome Emily!
One of my favorite ways to decorate is with photos. They are simple, unbiased storytellers that capture a moment in time to save forever. One important thing I’ve learned about taking pictures is that the photos don’t have to be perfect in order to communicate love, beauty and belonging.
The challenge for me is to actually take those photos that I love so much from the computer and get them into a frame. Sometimes I have to sift through 100 pictures on the screen to get 5 or 10 worthy of printing. But the end result of having a memory with a frame around it sitting on a shelf in my living room is far worth it.
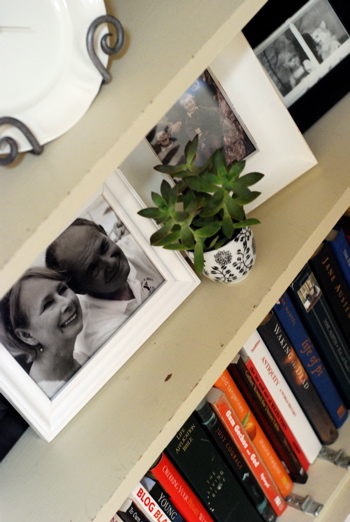
Most of the photos I print right now are black and white simply because it is easier on the eye. I love a good color photo, but when I have to look at it all day every day, I would rather notice my daughters face than the pink and blue striped shirt she had on that day.
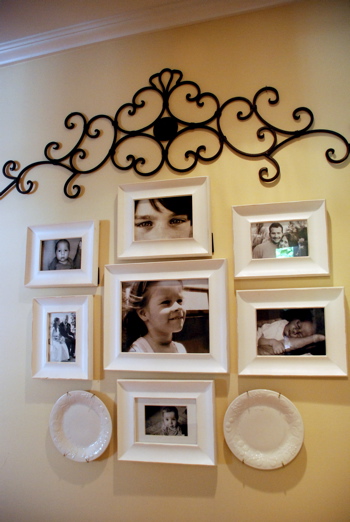
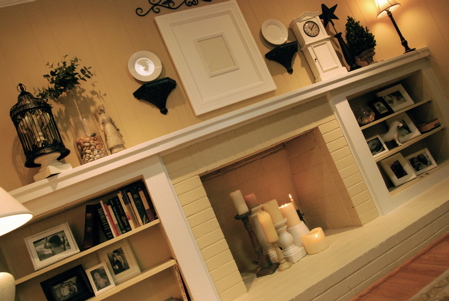
I have several walls like this in my house where I have clustered photos together. For less than $8 each, those frames were just the simple touch I needed to display some of my favorite people.
When I think about what inspires me the most in my house, these framed photos top the list.
Here are some tips to help get you started:
1. Tell yourself you will only choose 5 photos to print. Just 5.
2. Pick ones that are close-ish up on faces to eliminate the background distractions.
3. Upload those photos to your favorite online printing place. I like mpix.com
4. Convert the photos to black and white right there on the screen.
5. Get them all printed 5×7. Or you can mix it up with 4×6 and 8×10. To keep it simple, just stick with one size.
6. Your photos will arrive at your door in a few days. You don’t even have to leave the house.
7. Go to Hobby Lobby during their half off frames week, if you have a Hobby Lobby. Or even the dollar store sometimes has white frames.
8. Consider taking the glass out of your frames to reduce the glare.
9. Put your photos in the frames and display.
(these tips were shared by Emily in the comments, I just moved them up to the post so you wouldn’t miss them!):
all photos copyright Emily, Chatting at the Sky
THANK YOU EMILY!


Hi Melissa, Loving the frames, I like the collection of whites. :-)
I had a look at Emily’s blog, I love the way she has framed each post :-)
annes inspiring blog post..Feeling Flowery…..
I decorate with photos too. In fact I am working on replacing almost all my other art with photos. I have found that I spend more time in the rooms that are decorated w/ photographs, not sure why…
Great post!
Toni
The Happy Housewifes inspiring blog post..Menu Plan Monday ~ Clean out the Freezer Edition
So beautiful! I love the white frames and black and white photos. It all looks so simple and all you see is the gorgeous photos! Great post, Emily!
I love collections of photos too. I have them hanging all over the house and sometimes I wonder if that would ever deter someone from buying the house (you know how they always tell you to de-personlize when you’re selling) but it’s about living in the now, right?
Jen@ourdailybigtops inspiring blog post..if I win…a giveaway
Absolutely, I think unless your house is for sale, your home is for living in the here and now and all about what inspires you right now. If you are trying to show your home to someone else because it is for sale, you can de-personalize if necessary at that point!
Emily, I love your shelves…and your table…and your plates. And of course your photos. It’s so fun to walk through your house and see the people, places and moments you cherish. There is much to be learned from those frozen bits of time and your heart is tucked so carefully into each one. I can’t wait to start putting up my own! Thanks for sharing!
Kristen @ Beautifully Imperfects inspiring blog post..From my Front Porch
Emily you have such a nice home and you have a very clever way of using framed photographs to enhance your lovely home spaces. What a good way to remind your family and friends how much you value them.
Anns inspiring blog post..Feeling Beachy
How fun to see Emily here! I love her style and how she arranged the photos in her house. Looks great. I do the b&w photo thing, too, for the same reasons. They just seem to work better, longer (I don’t get tired of them as fast!).
Julia @ Hooked on Housess inspiring blog post..On the Market: The House from “Ferris Bueller’s Day Off”
Emily’s use of black and white photos for decorating is fabulous. It is simple, uncluttered, beautiful and captures wonderful memories!
Thanks for sharing!
Debbykay at Rose Cottage Gardens and Farm
Debbykays inspiring blog post..Gorgeous Greens {lightly dressed
Who doesn’t love decorating with B&W photographs? Certainly not me. Thanks for sharing.
Charlotte at Simply Divine Christmass inspiring blog post..Tomorrow is another day!
This is just the idea that my house was missing. I need to get my pictures out on display.
Ranas inspiring blog post..Basic Training Week 2
Hi Emily,
Any suggestions on how to get started..I have a billion pictures on my computer of my kiddos and would love to get some on the wall but I don’t have any frames and just feel overwhelmed on where to start?
Brandy
Lovely reminder Emily! I too am a fan of printed b&w over color any day – timeless, precious memories in print are treasures.
Ang @ The Creative Mamas inspiring blog post..Cloth Diapering 101 + Giveaway!
Yea – two of favorite people/bloggers in one spot.
Emily photographs just like she writes – with simplicity, beauty and truth. :)
Jen@Balancing Beauty and Bedlams inspiring blog post..Furniture Fun….frugal find!
Hi Jen! I love Emily’s writing and photographs too for those reasons :-)
Love the white frames- I’ve never done that before, always black. I think I’m going to try something new, thanks Emily for the inspiration. Love your home.
teresas inspiring blog post..Enrichment- A Gathering in the Garden.
I always notice the family photos when visiting friend’s homes.
They lend a loved and cozy feel to the home.
Becky K.s inspiring blog post..Blues at the Amusement Park
I love Jen’s comment–perfectly said. And I want to use photos more in my decorating–love your wall arrangements, sister!
The Nesters inspiring blog post..Lampapalooza Roundup
It sure is fun to hang out at Melissa’s with all the cool people! Thanks for the opportunity!
Brandy – I know how you feel. It can be crazy overwhelming when you have a ton of photos. Here’s how I would start:
1. Tell yourself you will only choose 5 photos to print. Just 5.
2. Pick ones that are close-ish up on faces to eliminate the background distractions.
3. Upload those photos to your favorite online printing place. I like mpix.com
4. Convert the photos to black and white right there on the screen.
5. Get them all printed 5×7. Or you can mix it up with 4×6 and 8×10. To keep it simple, just stick with one size.
6. Your photos will arrive at your door in a few days. You don’t even have to leave the house :)
7. Go to Hobby Lobby during their half off frames week, if you have a Hobby Lobby. Or even the dollar store sometimes has white frames.
8. Consider taking the glass out of your frames to reduce the glare.
9. Put your photos in the frames and display :)
10. And if you are me, apologize to Melissa for writing a novel in the comments section.
emily @ chatting at the skys inspiring blog post..before and after
Wow, Emily, this is another post all by itself! Great tips, I’m glad you shared them! And YOU are one of the COOL PEOPLE so I’m glad you spread your coolness over here!
It’s not easy arranging pictures on a wall, but you definitely have the knack. Beautiful!
Such a wonderful post! Thank you for the ideas!
Lanas inspiring blog post..Tweet ~ tweet!
Beautiful! I love this idea to death. It’s so much easier now to get great pictures with digital photography. I’m definitely going to do this!
Staceys inspiring blog post..Rhondi’s Porch and Patio Party
Love her. Great ideas!
AnNicole@OurSuburbanCottages inspiring blog post..An American Girl in Germany
I’m so excited to get more glimpses inside Emily’s beautiful and personal home! Love the photos. We have turned our stairwell and upstairs hallway into photo galleries, I love seeing the faces every day.
Kimm at Reinventeds inspiring blog post..The Party of the Year
I have some fantastic new pictures of my girls. I need to get them framed. But, haven’t really decided on a wall color for my living room yet.
SoBella Creationss inspiring blog post..Welcome & Giveaways
There are two schools of thought here; One i agree with — one — not so much.
Professional designers are constantly saying “dont put personal pics all through your home! save them for one room ONLY if at all.” — hmmm can you guess the one i dont agree with? (but do agree with this when you said to DE-personalize when selling– ok i agree)
Then, years ago my kids let me know how special they felt when i put FRAMES around them… in other words, when i took the time to put their very own pictures in frames and place it in a very lovely spot in my home… it helped them know how much i loved them and i put them right next to Grandmas’ special Vase. (it elevated their self worth…) and isnt that what mother’s are in the business of?
TTFN~~ Claudia
Claudia @ DipityRoads inspiring blog post..Cottage Details
I also enjoy displaying photos of my family and loved ones. I used a variety of frames and have one wall with lots of photos all framed in the same color.
I love your photo displays and the variety. The whites are a great idea for a frame. I will have to check out your blog too. I enjoy Nester and of course, Melissa. I get great ideas from both of them.
Debbies inspiring blog post..Sunday Morning Ministries
I love the black and white photos in the white frames. She has some beautiful pictures. Very nice.
beth daggetts inspiring blog post..Our little spelling champ
Hi Melissa,
You’ve been “Kissed by a Rose” because you always inspire me! See my blog to pick up your ONE LOVELY BLOG award. Thanks for always making my in-box such a happy surprise!
P.S. thanks to all the lovely women who visit your site and post comments on your blog that I enjoy visiting that I couldn’t name that help to make my day just a little bit brighter.
Charlotte
Charlottes inspiring blog post..Kiss from a rose…
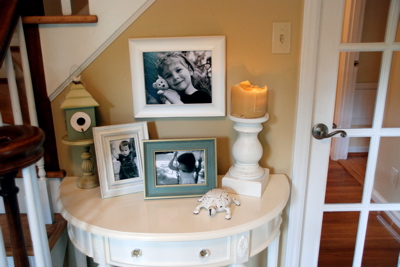
Thanks Melissa and Emily! Emily, I love visiting your blog, and not just for your decorating ideas! Your photo arrangements (especially with the plates) and tips are very helpful. Thanks for sharing.
Elizabeths inspiring blog post..Lampapalooza Party!
Emily’s home is lovely! Thanks for visiting me Melissa! Your blog is looking fantastic – hope all is well!
annechovies inspiring blog post..JOHN DERIAN AND EYE CANDY
Such wonderful ideas! Taking the glass from the frame. Printing in black and white to emphasize the person and not the clothing. Thanks for sharing!
Brenda
Brenda Kulas inspiring blog post..The Mess In My Yard
I love to use photos in my house and in my clients homes. Great ideas and lovely blog!
Laura Casey Interiorss inspiring blog post..happily repurposed
With my hubs being a photographer, we do the same. Only with black frames.
Lovely, Emily! As always …
sandys inspiring blog post..Yard Sale – SCORE!
That’s beautiful Emily! I love using photos all over. Our old house had a long hallway lined with frames. I can’t get enough of family photos!
~Kim
Kim @ Everything Etsys inspiring blog post..Make Your Own Photo Jewelry! {Giveaway}
Thank you so much Melissa and Emily! I love being surrounded by family photos, but have been reading that it is a decorating “no no”. I love the way Emily has printed and framed hers. laurie
What a wonderful post, great ideas.
Beach Vintages inspiring blog post..Follow the Yellow Boat Road
Great use of photos….Your blog is looking great…lots of good info… Fay
Hi Melissa
nice post as usual!
I am trying to get more photos in my decorating, I have a huge box of photos and some lovely b/w ones just sitting there, I don’t seem to be able to get my act together with them though, maybe I need the anti-procrastination thing again!
Sarah
Sarah @ A Beach Cottages inspiring blog post..Beach Cottage Old Antique Dresser & Mirror – Help Needed
I so love this post. I have lots of wall space and decorating with photos sounds like just the way to fill them.
Thank you.
Those are fabulous tips for photo display. I especially like photos that are up close and capture faces and personality.
Kate
Kate at Centsational Girls inspiring blog post..Girl’s Room In Bloom
emily, i always enjoy the things you do, but i love the words you use when you write about it just as much!
Thank you, Emily, for the starter tips!! I love a checklist, works well for my mommy brain!! :) I’m going to get started… your post was inspiring and I love how warm family photos make a house feel.
Brandy
You are all so encouraging! And I’ve heard that decorating ‘no-no’ as well and to that I simply say: Live. I have dared myself to celebrate the messy and the lovely that is my family without concern for holes in the wall or resale.
emilys inspiring blog post..tuesday bullies
I love B&W photos…I have a collection of them on my walls, in simple black frames of different sizes. I love them. I choose photos that speak to me somehow. And then I can sit back, and just look at those photos, and remember the instant when I captured them.
Your photos arrangements are fantastic!
kristen@nosmallthings inspiring blog post..Marbles. I think I may be losing them.
Beautiful post! I am spectacularly useless at displaying photos and this has been really helpful. Is photoscape a word?
I am like Brandy, I have a TON of photos and can’t ever decide which ones I want to display. I have a couple sitting around, but I want to add more. Thanks for the tips on narrowing them down, Emily!! I can always swap out pictures, or maybe i’ll get one of those digital frames to show the thousands of other photos I have lol
Tees inspiring blog post..Something Old…Something New
Simply beautiful! What an inspiration…I cant wait to work on this project! Thanks
Holly Blockers inspiring blog post..Joys of Summer!!!
What a lovely post! And good tips from Emily about how to do it–not just inspiration that we should use photos in decoration, but HOW we can use them.
Melissa, I like that your blog never ceases to be gently inspiring. You live up to your blog’s name!
Richellas inspiring blog post..The rest of the porch story
I love that wall of white framed pictures. I’ve got to do something like that in my next house!
Thanks for the tips too!
Jendis inspiring blog post..Ready To Dig In
Hi,
I need your help. I’m NEW to Home Decor Blogs and looking for ideas on decorating my home. And I really need someone who will have patience to guide me and not completely insult my own ideas. And I heard that this is the place to begin. Need help with a Navy Blue Dining Room with White trim and French Doors.
Emily,
I completely agree with you regarding personal photographs being some of the best artwork for your home. I have a wall of photos using black frames, some with mats some without. They are all color prints. I love your idea of using black and white shots. I think I will try this for a wall in my bedroom. Thanks for the inspiration!!!
.-= Mary Joy´s last blog ..A Peek Behind The Scenes In Our Wedding Plans =-.
I love your grouping of family photos! I got a large canvas photo of my grandkids sitting in front of an old rock building. It’s not quite large enough by itself. Any ideas of what to put with it? I love your combination with the plates and metal. Your colors are so soothing!