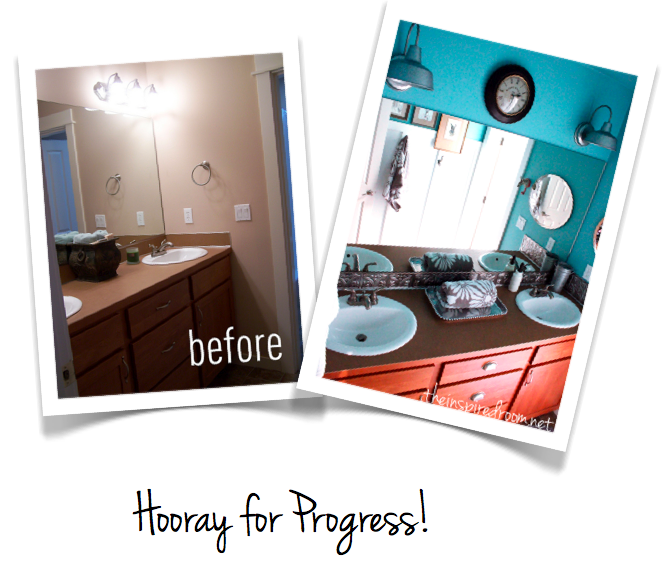
Update! Here’s what this bathroom looks like now (above!), after another bathroom refresh a few years later! :-) Below is the first refresh!

Boy’s Bathroom Before & After
So, last week I told you I was going to give my son’s bathroom a little facelift.
And now we’re done! Just like on TV.
Oh, wait.
No, actually, that was LAST YEAR that I told you were were doing this quick bathroom makeover!!
Holy cow, time flies when you are a busy family. A whole year! Anyhoo…let’s rewind the clock a little bit ALL THE WAY BACK TO FEBRUARY LAST YEAR and refresh our memories, shall we?
When I say it was last year when we started this, don’t be fooled — it didn’t really take a year. We really only worked on it a handful of days. This was just a quick facelift, not rocket science. But we are just too busy to work on it five days in a row. And, it was mostly done awhile ago, I just was kind of lazy about taking pictures.
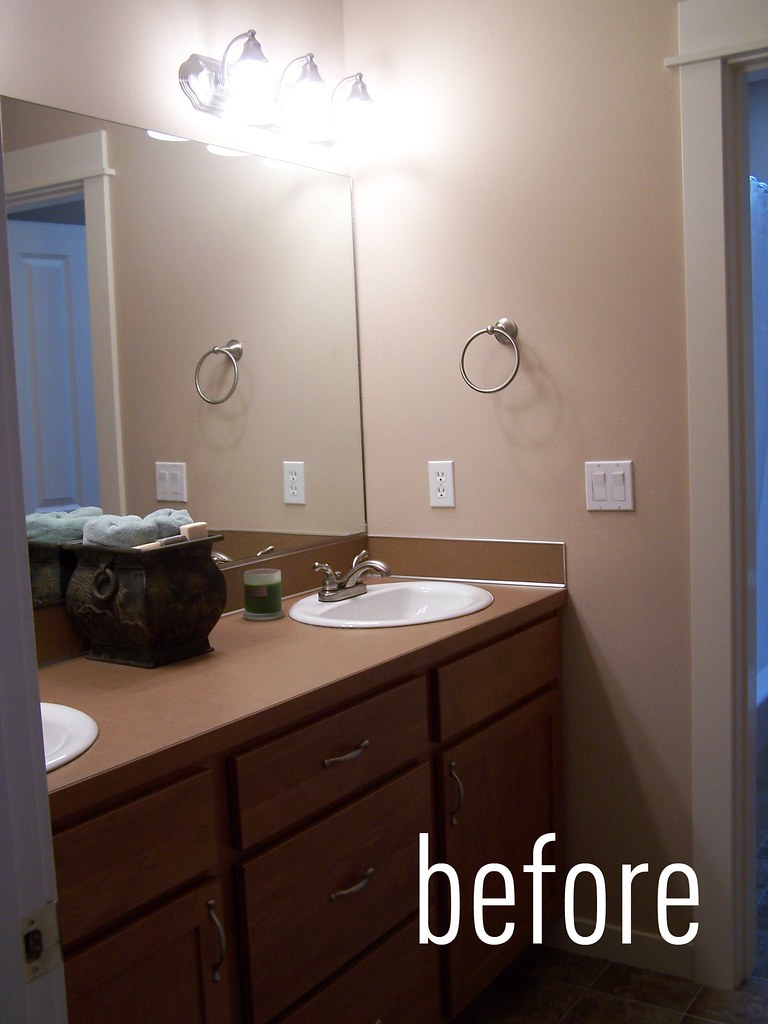
This room I speak of was a fine enough bathroom to start with, better than many I’ve had in the past. It is a new house so we aren’t trying to deal with bad remodeling or horribly outdated rooms or anything. I’m not really a fan of ripping decent stuff out just because you have a whim to have something new, you know? so that wasn’t my plan at all. I knew we could make a few little updates without going overboard, as it was little on the dull not-so-youthful-or-fun side.
While mostly this is my son’s bathroom, my daughters also use it when they are home. So it had to be decorated for all of our kids and guests alike. We decided quirky-fun would be better than new-house-dull, so that is what we set out to do on a small budget and a few days of effort.
The first thing we did last year was to change the drawer pulls. The vanity is a natural brownish wood and I initially wanted to paint the cabinet but after painting all the walls, I just wasn’t in the mood for more painting. Pulls make all the difference so we were fine with leaving the cabinet natural wood. Time and money saved. BOO-YA.
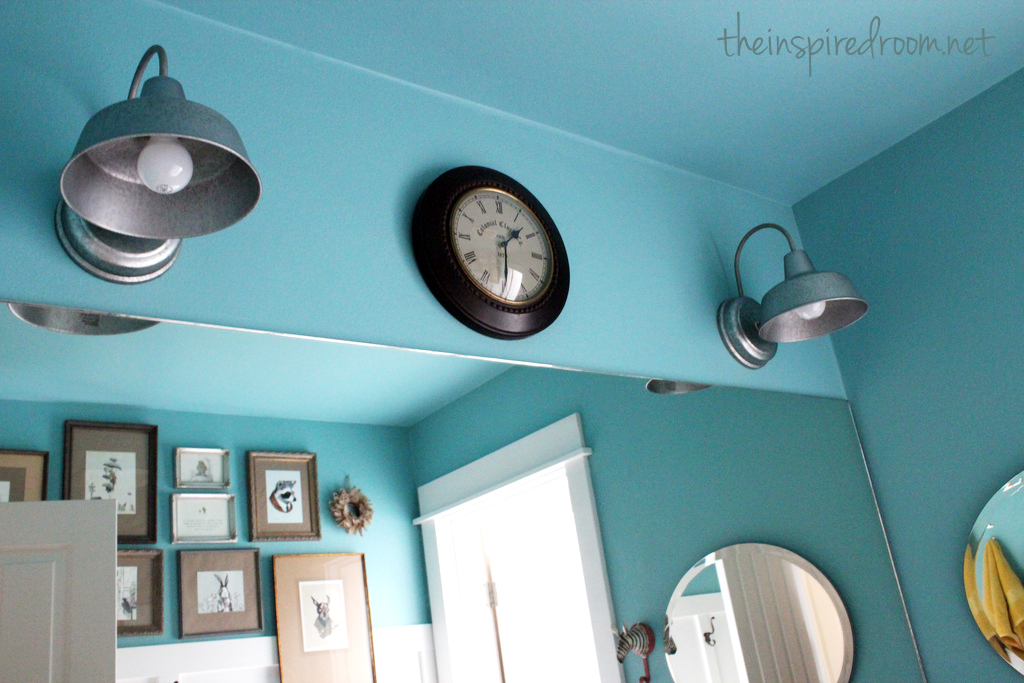
I decided I would abandon my usual neutral wall paint and let this room be a little pop of happy as you come down the hall. I have to say I love rounding the corner from a more serious gray hall with white trim (which I love, Studio Taupe Behr all in one) and then feeling a big smile come across my face when I walk in this room.
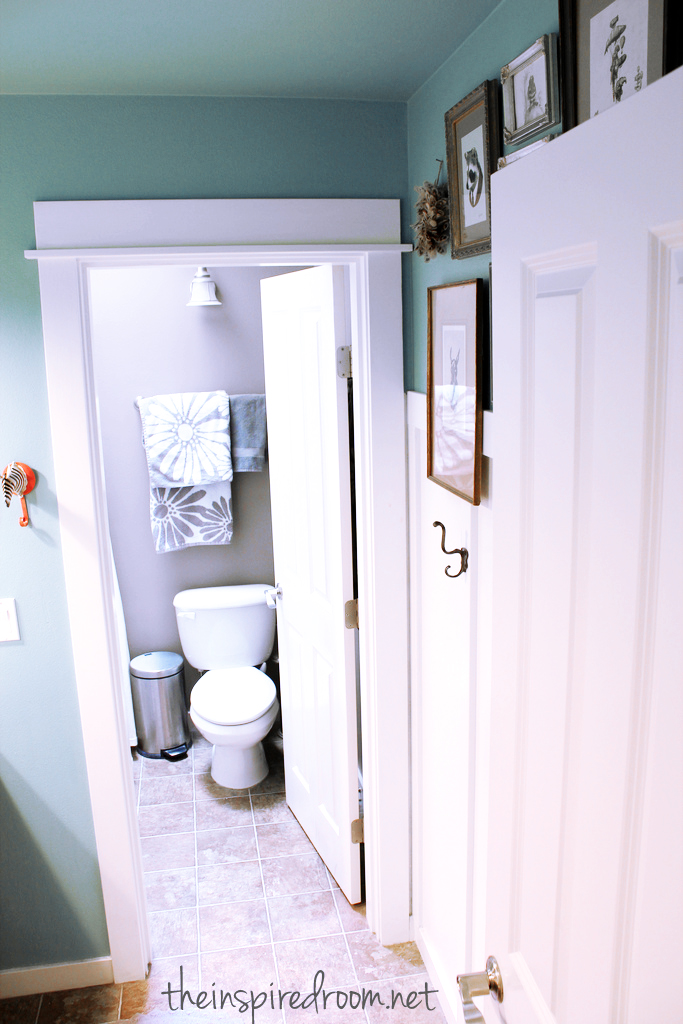
At first I was worried about how bright the teal – turquoise color was (Lagoon by Martha Stewart) and had visions of people getting headaches and wanting to wear sunglasses upon entering, but by simply painting the shower room the same gray as the hall, it all balanced out just fine. Now I love it!
Then we did a very simple white board and batten treatment on just one wall. It was fairly easy and painless. More math than we’d like, and some snafus with getting the right white paint color, but we worked around it all and got it done. We ended up painting the board & batten and doors White Dove from Benjamin Moore. The walls are Martha Stewart Lagoon. The potty room and hall outside the bathroom is Studio Taupe, Behr All In One.
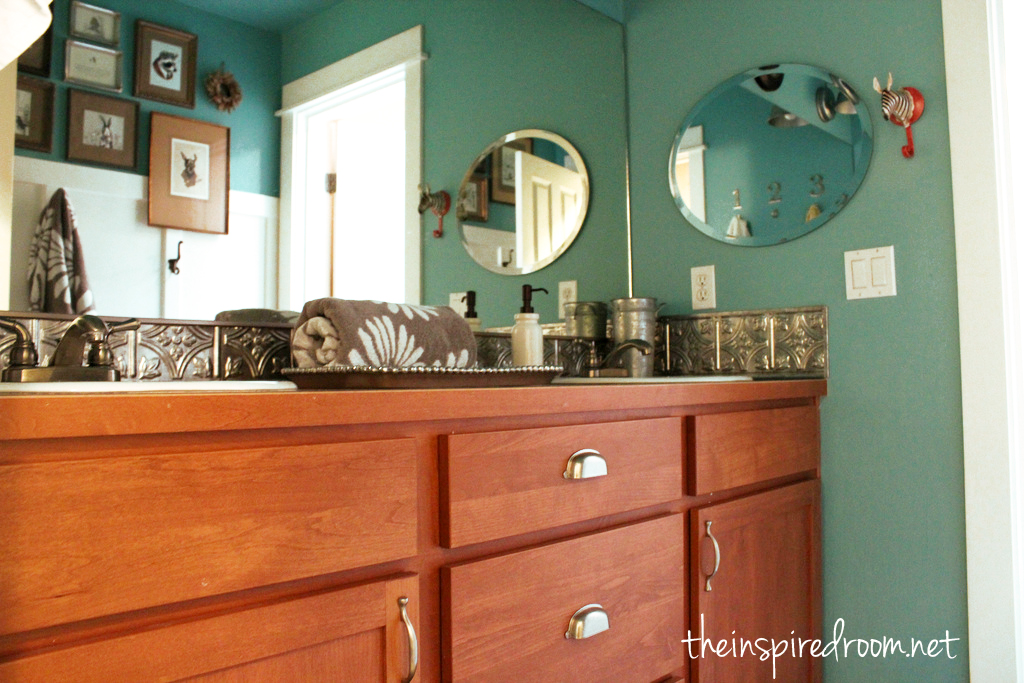
On the sink side of the room, we had some thinking to do. In order to do more board & batten we’d have to do more cutting and trimming and tie it all into the counter. NO! Too much work. Maybe not for you DIY Divas out there, but I have my limits. Or maybe I’m lazy. But really a fancy kids bathroom was not at the top of my list of things to do last year. So, we just decided to make things easy on ourselves and paint the walls.

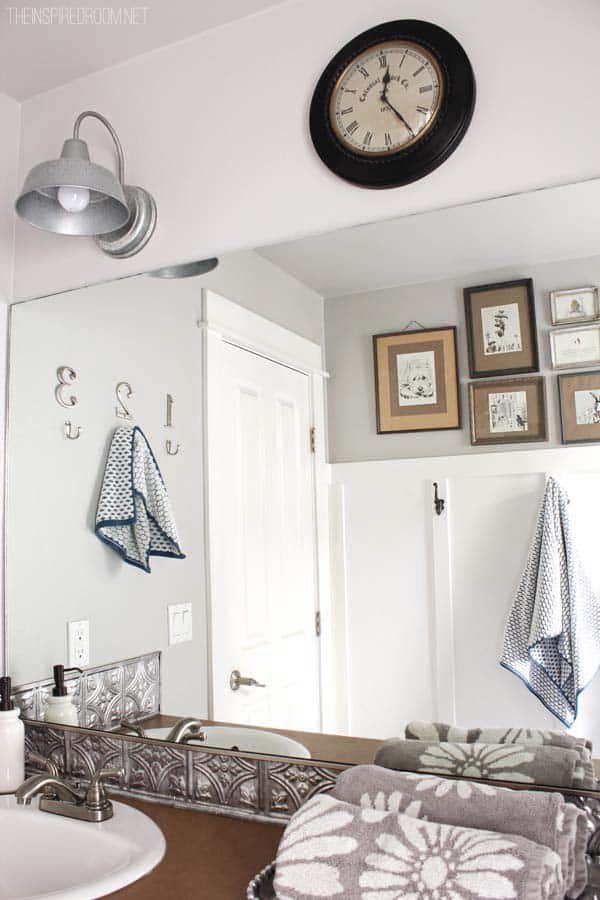
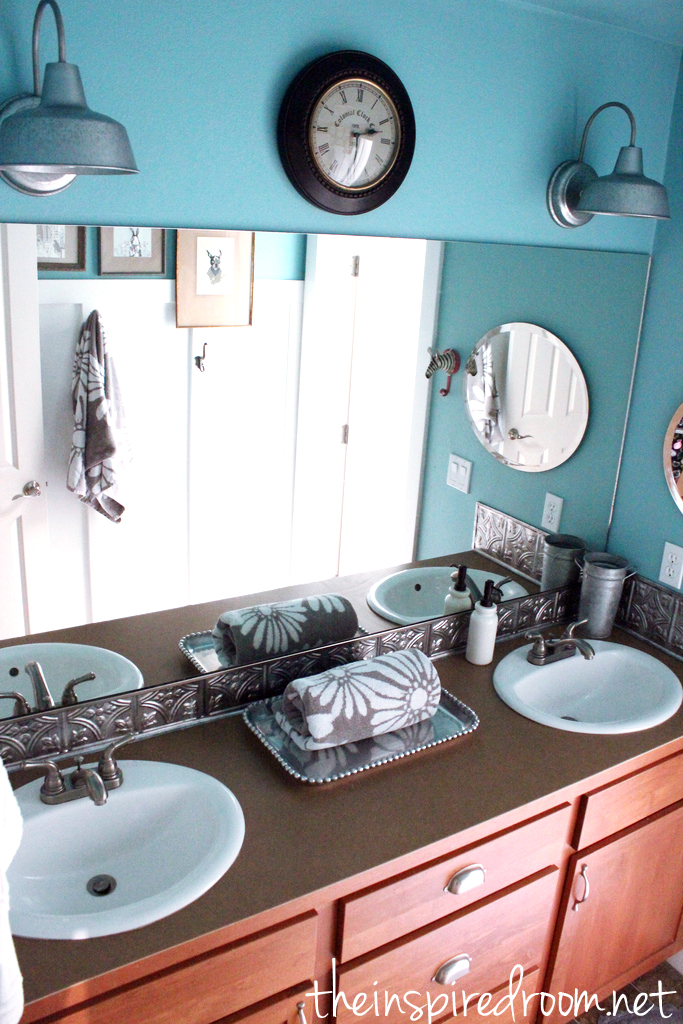
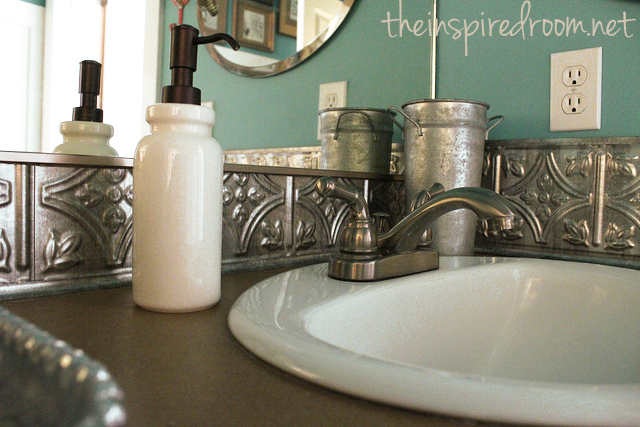
But I really didn’t like the existing Formica back splash. I mean, the counters are not my fave either but why use Formica for a back splash too? It was just too much for me. I didn’t want to go through the hassle of new counters right now and I wasn’t in the mood for a tiling project (blah blah blah), so I found a simple solution at Home Depot. Faux tin ceiling tiles. They were super easy to cut and install. And so pretty! This is an easy-peasy durable non-messy project that can be completed in a very short time. Score.

Here is the tutorial for how to do this faux tin ceiling tile backsplash!
And it will be no problemo to change out the counters and back splash if we want to in some future makeover.
I thought about framing the mirror too, but decided not to. There is already plenty going on in this room without framing the mirror, so I just left it simple and clean.
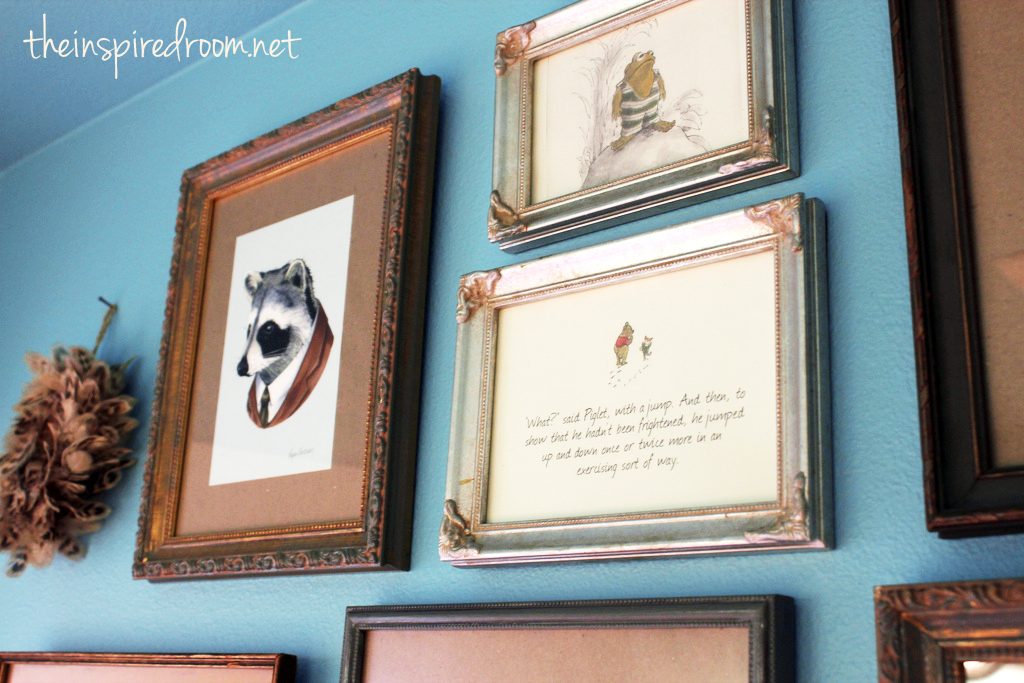
Then since we decided to keep the existing counters, we wanted to tie it all together so we went with metal and brown frames (that we had around the house) and quirky animal artwork on the opposite wall. We had or made about half the art and the rest came from Etsy shops.
Why quirky animal art, you ask?
Because my kids and I have always cracked up over animals. We thought Funniest Animal Videos was the most hysterical show ever. We laughed ourselves silly reading Frog & Toad are Friends. Now you know why we find so much humor with our puppy Jack. Apparently we just think animals are hysterical. And animals in swimsuits or sweaters are particularly humorous. Maybe we are weird.
Like I said, we smile when we come in this room.

And yes, I know one of those pictures overlaps the board & batten and the hook is lower than the rest. I did that on purpose. I don’t like a room to be too predictable, so I kind of like that element of surprise where the picture overlaps and ties into the board & batten. Quirky. Rebellious. Rule Breaker. If you don’t like it, don’t do it. Freedom of creativity is ours.

There is probably nothing more awesome in a home than hooks. Am I right? I bought these chunky beauties years and years ago. Glad I still had them, they were another great tie in to the metal accents and they have loads of personality. Not to mention, hooks are just crazy practical. So much more so than towel bars, I think.
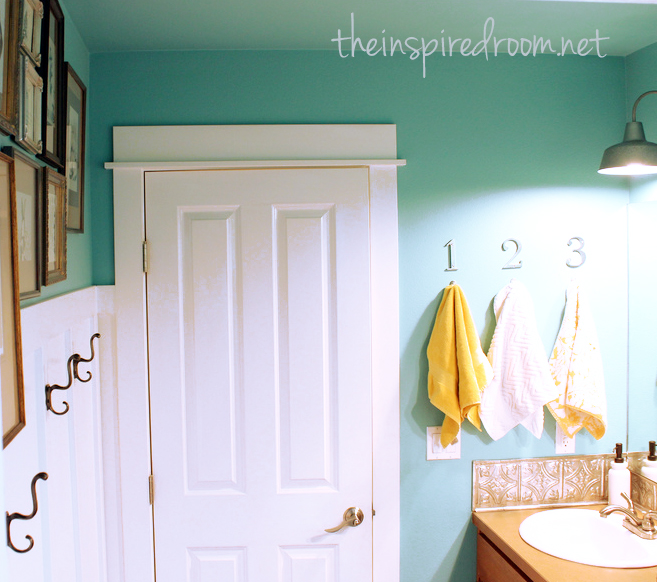
We put a variety of hooks everywhere we could. And a few numbered ones for our kids to keep track of their own towels or whatever they need to hang there. You’ll also spot a quirky little zebra hook in some of the pictures. Cause every room needs a quirky little zebra. That is what I always say.

This is just a little peek at the shower/potty room. That flood of light from above is a skylight. As I mentioned, we painted this little room Studio Taupe to tone down all the turquoise. It is nice a crisp with the white waffle texture shower curtain and all the white trim.
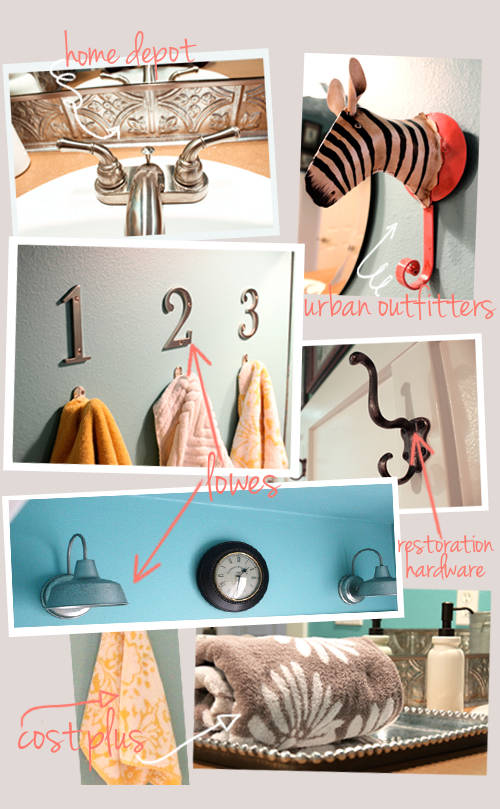
So, lastly, I decided to change the lights above the vanity. I really hesitated because the existing lights were fine and as I said, I don’t like to just change things because I’m a decorating snob or obsessive about my house. But, let’s be honest. I LOVE light fixtures. If they have personality, they make such a big statement in a room. And really, these industrial work-type lights gave a lot of bang for the $25 or whatever they were at Lowe’s. I had to have them.
So, there you have it. Our kids’ bathroom facelift. I can’t say it is “the after” as I don’t think this will be the end for this room, but it is done enough for now! And that is always a great feeling!!
Movin’ on!
Turquoise Paint: Lagoon by Martha Stewart
White Paint: White Dove, Benjamin Moore
Gray Paint: Behr All In One Studio Taupe
Linking with: Today’s Creative Blog
If you enjoy The Inspired Room, consider taking two minutes to vote for me in the Apartment Therapy Homies Awards? I don’t usually ask for votes but it is such an honor to be nominated. All you need is an email address. Easy! Thanks!


This is amazing! I love how you brought personality into a bathroom without making it too over the top. Seems like this will stand the test of time…until you get bored with it, of course. The color was a brave choice, but it turned out beautifully…a risk well taken! I especially love the quirky animal prints. And I LOVE the faux tin backsplash. What a great idea! I’m not sure I’ve seen that in a bathroom before, but I’m pinning it. High five for creativity and originality…on a dime, no less!
LOVE the makeover – it’s gorgeous! The blue is beautiful, I love the backsplash (so easy) and the towels and the hooks are super cool. You’re so talented and I think it’s worth taking your time if it turns out like this. :)
This is such a cute and fun bathroom, I love it! Great color, fun artwork and functional for kids (love the hooks, I’m adding them to my bathroom as we speak). I love the little unexpected elements you added. Well done!
This bathroom looks incredible! Those photos are a fantastic idea for a kids’s space, even for older ones, as I’m sure it brings back many memories for your girls. Love the colors, the light fixtures, and the fact that you didn’t totally change everything! I’m gearing up to give our kids’ bathroom a makeover, so this was really helpful for me in helping me to see that I don’t need to do a huge overhaul in my 1 year old house :)
girl, it looks great! that turquoise is great…and love those number hooks! fun…and i like your timeline much better than TV timelines. :)
And where, pray tell, did you find the animal art? It’s just divine!
Thank you dear, some of them I bought on Etsy and some I already had or just photocopied to create my own art :-) xo
Love what you’ve done in this room. The color, the faux tin tiles and the paneling on one wall. The gray shower.potty room is nice too. Thanks for sharing Melissa. Better late than never.
Wow, what a beautiful transformation. I love the lights, the board and batten, the hooks, the paint color…everthing. Congrats!
Well done! This is a sophisticated boy’s bathroom without being too adult looking. The color is bold but balanced by the white woodwork, classic artwork geared toward boys….and I love the tin backsplash idea! Beautiful room. Thanks for sharing!
Way too cute, in a very sophisticated way. It looks great! And I’ve got to say, I absolutely love the paint color.
I can’t get over how well that color on the walls works so well in there, Melissa! It’s balanced by the grey in the shower area and the white b&b and even the mats on the pictures. All your little touches are so fun!
Thanks so much!!!
love it melissa! so many simple, doable touches that lift the spirits. my fave is the the animal print collection. LOVE frog and toad.
I’m wondering: How did you affix the backsplash?
hugs, friend!
Tape! There was some special tape that you could buy to adhere it to the wall!!
Great job, Melissa! I especially like the ceiling tin backsplash (PINNED!) I don’t think I’ve seen that done before–tell me, can it be painted?? Thanks for sharing all your hard work!
Yes, you can paint it!
Fun, fun, fun! Who wouldn’t want to go in there? Or “go” in there!
So cute! Love it–especially the prints on the wall!
I love the way this room looks! I think I am going to have to copy it!!! I already pinned it!
I am completely head over heals for those faux ceiling tiles as a backsplash! That is an amazing and creative idea and it looks fantastic. Great job on the whole room!
Immediately I noticed the light fixtures!! Love!!! I’ve been eyeing those at Lowe’s for some time. They are perfect in the bath. And the clock…great idea. Then I spied the tin tile. (The Formica with the metal trim – blech!) That brought everything together and gave it unity and purpose (right?). You rocked this one! Again! It was worth the wait, sorta. You know how to tease your readers and keep them hanging on for more! HaHa! Love your style and pizzazz in the details!
Ha, well thanks Diane. I’m sure people forgot I was even working on that bathroom. I’m kind of a slowpoke :-)
It looks fantastic. Love the color. Love the backsplash and the new light fixtures. What a great idea to have numbered hooks for a bathroom used by several people. I don’t care how many years it took you ( ;> ), excellent job!
This looks fabulous! I can’t believe you waited a whole year to show this off. I especially love the art, great job Melissa! Have a fabulous day!
It looks awesome Melissa! Love the tin backsplash! I have one of those rooms thats taking a year as well to makeover- it just makes it all the more special when you finally finish it,right?
Your blog is appropiately named—it does inspire all of us to make our homes a better place and a cozy haven for our family and friends. Thank you for sharing your home, your decorating adventures and your sweet self with us.
very cute! it’s amazing what a difference those drawer pulls make.
Meliisa – It looks just great! The layout is very similar to my own bathroom and I love the updates you incorporated. Hooks win over towel racks EVERY TIME!
I love this ! It’s so adorable. I am in love with the Zebra hook from UO !
So cute!!! You made some great choices! I really love the improvised back splash – how innovative. Great job!
I love great lighting too. It can really make a room wonderful! Love the ones you picked. And I’m with you on the hooks. Much better than a towel bar!
Awesome makeover. Love all the animal prints, too cute.
I adore the tile backsplash you made. I might have squealed a little bit when I saw it. Now, I need to think of somewhere I can put it in my home…gorgeous job. I love all the unpredictable elements.
I love it! The turquoise is striking and fun. Love the way you incorporated so many personal and practical elements!
Awesome job…..
Kathy :)
Oh my word, I love everything about this room!
Thanks Anne!!
I love it!!! It looks as if I just walked into a ‘Model Home” and want to take it home and make it mine!!!! It speaks personality, functional, style, warmth…… just beautiful…. well worth the wait!
Thank you! Debbie from the Northwest
i adore quirky…and rebels ;) you did a wonderful job! GREAT room.
Love it Melissa! It looks so awesome! I especially like the faux ceiling tiles as trim…..GOOD CALL! I have been looking for some ceiling tiles for my bathroom ceiling. Also love the board and batten. FABULOUS!
God bless! Fi
I love it! I want to makeover my boys bathroom too. I REALLY love the backsplash idea and am wondering how you installed it. It would solve a huge problem with the one I hate in my master bathroom!
Thanks!! It is so easy but I’ll try to put together a quick post to show just how easy it is!!
Yes, please post a blog on detailed instructions for backsplash. Our counter has no backsplash and water gets on the new paint. I would love to see how it’s done. Great blog!
OK, I’m putting one together right now. I’ll have it posted in the morning! :-)
It looks so great!!The color and accessories are perfect.
This room makes me smile too! It helps that turquoise is my favorite color. I love how you’ve taken it from just fine and ordinary to bright, cheery, and personal.
Great room! The quirky animal art cracks me up! Especially the way you have it framed and displayed in such a traditional manner. Seriously love that. I also love the backsplash- I had forgotten about those panels at Home Depot. I think I need a glossy white backsplash like that in my $18 newly re-vamped kitchen!
Melissa,
Love the color and the whimsy of the zebra!
The towels are cute, too.
I wish I had thought of hooks rather than towel bars. Someday I think the towel bars are coming down…
We just ordered a steel tile like the faux one from Home Depot. (I love the fact that were able to cut your with scissors.) The back splash looks so finished!
If my hubby read correctly, he just ordered 1 real tin panel. It’s going behind out stove for a little vintage feel…in our new Jimmy John’s kitchen.
Your bathroom has given me lots of ideas. Thanks for sharing!
Wow!! Looks amazing!
xo
The blacksplash is indeed the neatest thing I think. I know other posters have asked and I too really want to know how you did it. I saw that you used tape. Maybe if you can even write up a quick how to. Nothing fancy. I would appreciate it. Nice work. Very creative!!!
Yes, I’ll do a real quick post on it and hopefully post it tomorrow. SO easy, really!!!
SO CUTE! I love the transformation!
Love the turquoise. What a difference! Just did a little turquoise/red inspiration board {www.hersplitends.com}. Must be on the same wave length! Great job!
I think that beautiful wood vanity is a fantastic match for the turquoise walls. And those Lowes light fixtures are to-die-for!!
Thanks yeah, I thought the vanity looked much better once I got the walls painted. :-) Thanks for your comment!
Melissa,
Wow, what a successful transformation! I love the DIY trim around the vanity. Very creative and pretty. Great job.
Karen
It looks great and I love the color. I painted an armoire that color recently and love it. A suggestion for the countertops: Behr’s Bellage a Faux (not sure if this is the correct spelling). It’s easy to use, very durable, comes in several colors, washes up with water and leaves a lovely textural surface behind. Ask the paint folks at Home Depot to show you. I’ve used it on two counters I didn’t want to replace and it worked great. Just make sure you seal it with varnish.
That is a GREAT bathroom. I’m going to pin it.
I love it! I also love that you were able to do it without going overboard; my house is just new, too (first owner, built in 2009), so it doesn’t need renovating or really updating, but I would like to make some touches to bring it up a notch from “builder-grade”, and I think you’ve done it perfectly here. Congratulations!
Thank you Susan, YES, that is exactly what I thought. Kind of unnecessary to spend a lot renovating at this point but adding a few little touches makes it feel more like home for now! :-) Thanks!
what did you use to put the silver ceiling pieces up?
I’ll put the “how to” post up in the morning!
great …I mean FABULOUS color choice. Beautiful room!
Love the faux tile backsplash! What a wonderful idea. Where did you get the drawer pulls? I want/need new ones in my kitchen, but they really add up.
Home Depot! :-)
Love the color and the cute animal prints (yes, animals in swim suits are funny)!! I too have a thing for lighting and I’m glad you changed yours! The color is great, all the hooks (I’m a hook girl too)! Great job.
Kelly
Melissa, I absolutely adore this. I remember you telling me about the animal montage in your bathroom back when we were in Charleston, but I couldn’t visualize it (and figured it was a good excuse to come see it in the flesh). But now I see it! And I love it.
And yet I may still need to come see it in person.
It look Mahvelous ! Love the Blue and the tin and the lights and the hooks…fantastic !
I have to say I love the clock in there. I’m one that hates to be late. So I have a large clock in mine to. That way I always know how long I have to get in and get out.
Love the tin tiles. I have been seriously considering tiling my ceiling. But putting it in the master bath might be a much cheaper way, plus I can see if I REALLY like it before investing in the whole ceiling.
Melissa! Gorgeous! Not that I’m surprised. Favorite elements: the hooks, light fixture, and framed prints. All pulls together wonderfully!
Thanks for sharing all your creative genius! It looks great and having 3 kids myself, love the idea of the numbers over the hooks AND the clock! It’s a wonderful space for you and the kids!
Love it from top to bottom. The batten board, the WALL COLOR =) and the light fixtures are awesome. Love the zinc look. I am totally into the whole thing!
Oh yeah! Lovin’ the re-purposed backsplash! Real nice!
Love your bathroom! Did the tin backsplash go over the formica or did you have to pull the formica off first? How easy is easy? I’m so tempted to tackle this project, but new at this diy stuff…
I removed the formica backsplash first, it was easy to pull off. I’ll show you in the post tomorrow! You could totally do this, Robin. I promise!
Melissa, this room just makes me happy! *LOVE* We really need to do something with our kids’ bathroom, which is also our guest bathroom. You’ve given me loads of inspiration!
So many great touches, Melissa! Love that pop of color!!
Looks great!!! Love everything!!!
Love the backsplash and all the hooks!! Fabulous!
Hugs
SueAnn
The zebra head hook is my favorite surprise in the room. Can’t wait to read the tutorial on the black splash that can be cut with scissors. Woo hoo! Last but not least I love seeing the Before and Afters side by side. Please come to Boston in the spring time…lol. Take good care!
What a transformation! Wow. I love all the details you added to the room. So fun! :)
I love the color, it’s so happy. I also really love the animal artwork. Great job!!
Wow, this room is AMAZING! Definitely worth the wait! My favourite parts are the lights, and the picture that overlaps the boards & batten with the lower hook. Quirky is so much fun!
I love the personality you added to the room. I’m definitely going to check out those light fixtures from Lowes!
You are absolutely right. Towel Bars are worthless, especially for boys. It is confirmed in my household that they will hang stuff on hooks, but towel bars–well they aren’t so good at that. I knew there was a reason that i hadn’t hung up that new towel bar in the bathroom yet.
love the lowes light fixture.
Hi Melissa, fantastic job on the bathroom! What a difference a little paint, sweat and tin can make! Also love the pics and hooks. I know stuff like this takes time but it is so worth it in the end. You should feel really proud! Hopefully the kids love it too!
I love the idea of using house #’s for the bathroom hooks!
I really love the light fixtures. Were they in the regular lighting section at Lowes? I am ready to go get them!
Outdoor lighting section! Good luck! :-)
Unbelievable I love the bathroom. I just came across your blog today. I
have to say your are a ton of inspiration. My fav is the back splash. Im totally doing this for my sons bathroom. He is 16 so there wont be any funny animals LOL :) on the walls but you have really given me some ideas to work towards without being scared Im getting in over my head. Thanks
So much fun! Of course, being a beach lover, I love the turquoise! And I love that you’re a rule breaker too!
Smiles,
Lesli @ Beautifully Coastal
You are a woman after my own heart! I’m a sucker for numbers and hooks too…
Love how it turned out and the bright color is just so cheery!
:)
Linda
Melissa, I love this room and your thoughtful, funny post! And the animal art made me smile–my daughter and I read Frog and Toad all of the time, so I recognized the picture of Toad in his swimsuit (though my personal fave is the story where Toad gets covered in ice cream and leaves and all of the forest critters think he’s a monster). I actually laughed harder over that one than my 3 year old did–not sure what this says about me. :) Amy
I love this bathroom! It is just the inspiration I’ve been looking for… now I have to see if it will fly with the guys. See we have 3 (yes THREE) teenage boys sharing a tiny bathroom (think the same width as a bathtub) with a tiny sink crammed in the corner. We already have hooks but it is really blah! So maybe this will perk it up a bit… and maybe some art! And it definitely needs a clock!! What is it about guys and hanging out in the bathroom? :) Thanks again for all the inspiration!!
I can’t wait to try the faux back splash in my bathroom!! Thank you for the instructions. I had looked at the same materials and didn’t know how it would work to cut down to fit my space. After seeing your completed project and instructions I went back to our local home store and was able to buy all the necessary items!!
I stumbled upon this post just in the nick of time! I am about to repaint my kid’s bathroom aqua as well. We moved into our home 8 years ago and I have wanted to repaint the grey walls aqua for several years now. This is the summer I’m geting it done! I was considering Benjamin Moore’s “Lucerne” after seeing how striking it is my friend’s living room, but I think this brighter aqua might be better. The cabinets and accents are all white and I really think this aqua is just right to spruce up this room. I want to make it an ocean theme and I have my eye on some starfish and sandollar art to hang on the walls. Ballard Designs has some great ocean themed decorations. SO excited for this project. Thank you Melissa for the inspiration! :)
Melissa,
In the picture frame scheme you created, you have one of a rabbit that I love. Do you happen to know where you got that from?
Thanks, Christi
This is gorgeous!! I LOVE the turquoise!! And the back splash idea is Great!! Awesome job!! This makes me excited about working on my own boys’ bathroom!!:) Thanks for sharing!! I am your newest follower. You can follow me back at: http://www.preparednesswithmegs.wordpress.com
Megan
I love the bathroom! I am getting ready to redo my kids bathroom, you have inspired me to think outside the box! I especially love the batten treatment that you did on the one wall. Do you have a board at the bottom of the wall as you do at the top? Could you send me a picture? I have a tile floor and tile on the wall rather than a baseboard. I am thinking I would need to remove the “tile baseboard” and add wood baseboards. any suggestions?
Melissa, I see this was back in 2012, I am curious has the back splash held up. We look at some recently in Home Depot, but from what it said on the box, it might not do well where there is water. I am considering using it as a back splash in my kitchen. I would appreciate any feed back you have on this product. Thanks, Joyce
Love the zebra!! And faux tile!!! Good job!!!