
It is time for the June {ditto} DIY challenge!
Have you noticed that gold is back in vogue and EVERYWHERE right now? For me, gold and brass never went out. I still have gold and brass throughout my house from years and years ago. I’m not sure what that says about me. Ha, I love when trends come back around again. It is nice to not have to jump on the bandwagon since you are already on board!
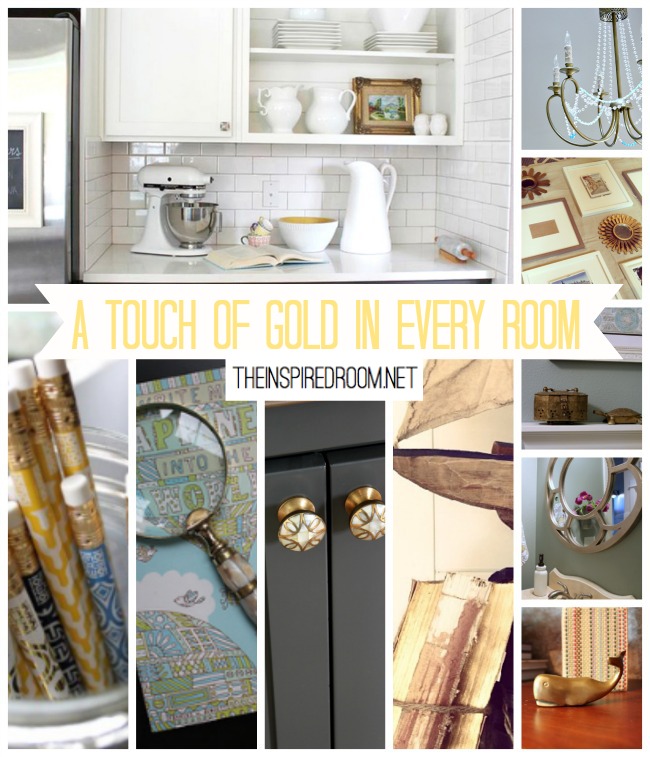
I love gold and brass because it brings such warmth and class to a space! I’ve had that whale, brass box, and framed art forever! And that is just a fraction of all the gold/brass items I have.
You don’t have to have much, but even just a touch in every room can give that slight edge of sophistication, even if you have a casual home like I do.
I tend to be a metal mixer, so I guess I’m ready for any trend at any time. Heh.
When it came time to do a project for the DIY Ditto Challenge this month, the theme was “paint something gold.” I wasn’t feeling very inspired since I didn’t feel like I needed any more gold — and I don’t really like to do projects that are just for show or for sake of a project, you know? So what to do? I was stumped.
But, I agreed to do this challenge so I was determined to find a project to do!
I don’t know about you, but sometimes I just need a little inspiration and a challenge to motivate myself for a project. I do work on my home as much as I can because it’s really a fun hobby for me, but even so, sometimes I’m a big procrastinator. And sometimes I’m just plain ol’ STUCK and I cannot wrap my head around a solution for an existing decorating problem. So I do….nothing.
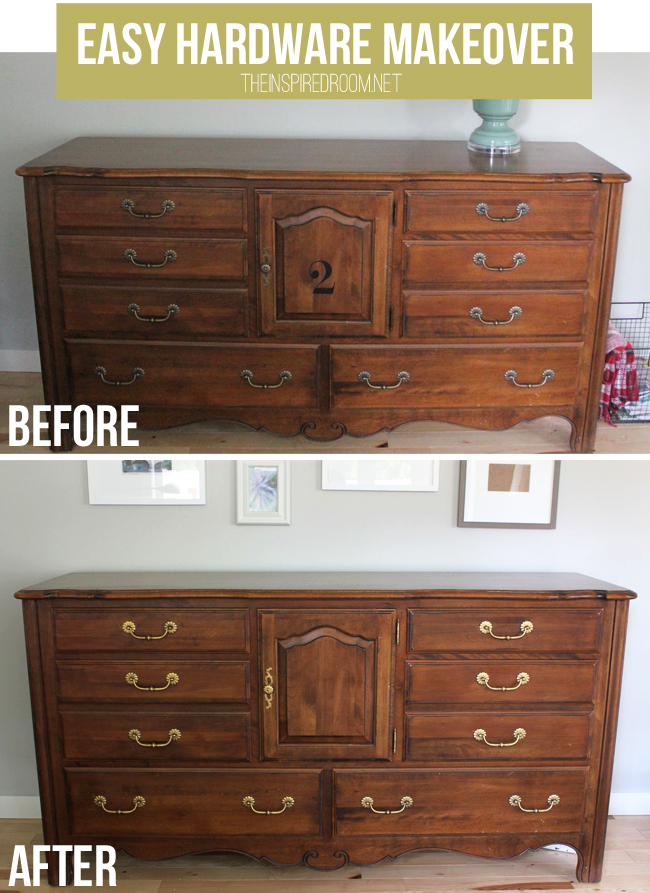
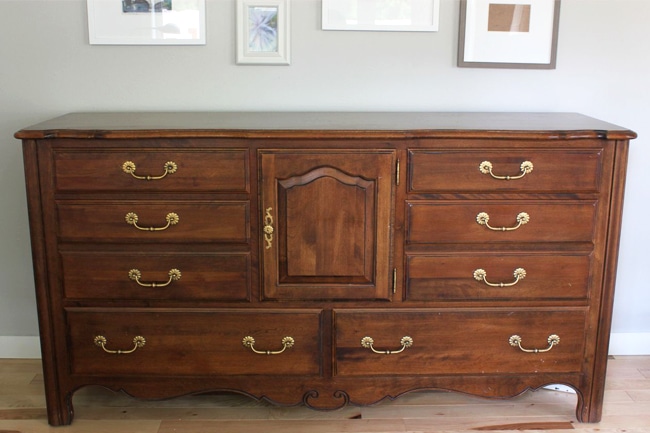
You might remember I have had a dresser that has been in my house for years. First we put it in our dining room and then I decided it was really taking up too much space so I moved it to our family room.
It fit better in there, but it still wasn’t ideal for the room and it felt a little dull and blah to me, but it is great quality and serves its purpose (to hold overflow dishes and table linens).
One thing I’ve learned in life is it’s easy to want to “live with what you love” but sometimes you just make the best of what you have because life isn’t always about being perfect. Sometimes life is about being more practical or selfless or responsible or patient or making the best of what you’ve got. At least for awhile!
- My ideal would be built ins. But that isn’t in our budget or plan right now.
- My second ideal was something like a free standing IKEA or Pottery Barn cabinet where you could pick your own components. But again, neither are happening right now for various reasons.
- I don’t want to paint the dresser, partly because it’s my moms and she may want it back soon. And partly because I just don’t really want it as a painted dresser in this room.
- I have no where else for it to go in my house until my mom can get it from me. Soooo, that means it is staying in the family room for at least awhile longer.
As I’ve said before, just because something isn’t the “perfect” solution, doesn’t mean there isn’t a way to make it “better than it was.”
I even thought about changing the hardware on it at one point to give it a new look, but of course I couldn’t find any hardware that would fit the existing holes or that I was really jazzed about. And, I didn’t want to spend a lot of money on it since it wasn’t going to stay here long term.
So, I was kind of stumped as to what to do.
But then, I had an epiphany:
I had a dresser with kind of blah hardware.
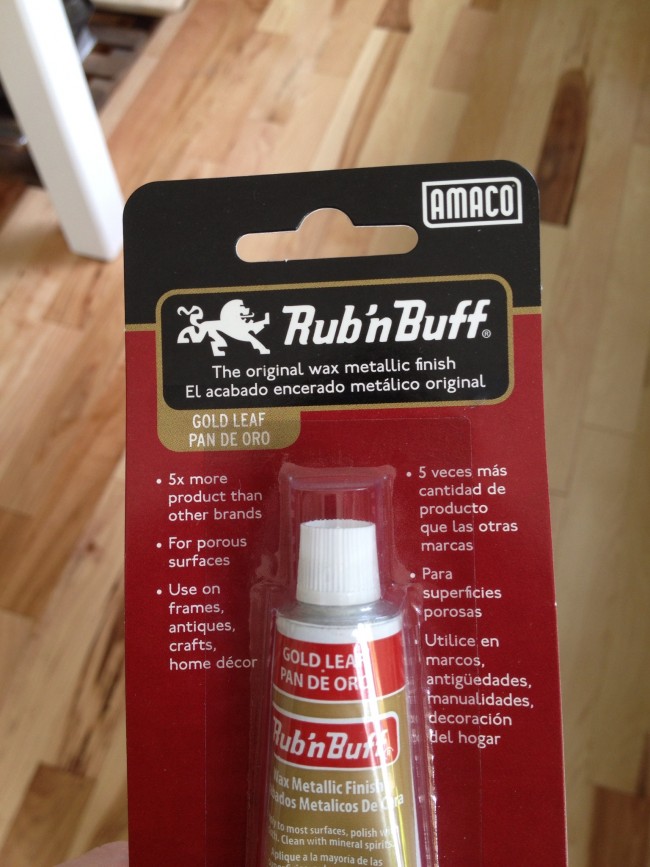
I had a tube of a product called Rub n’ Buff Gold Leaf (from Michaels’ Craft or our online shop in the Favorite Crafts/DIY section),
That was all I needed for now! Just a simple HARDWARE MAKEOVER!
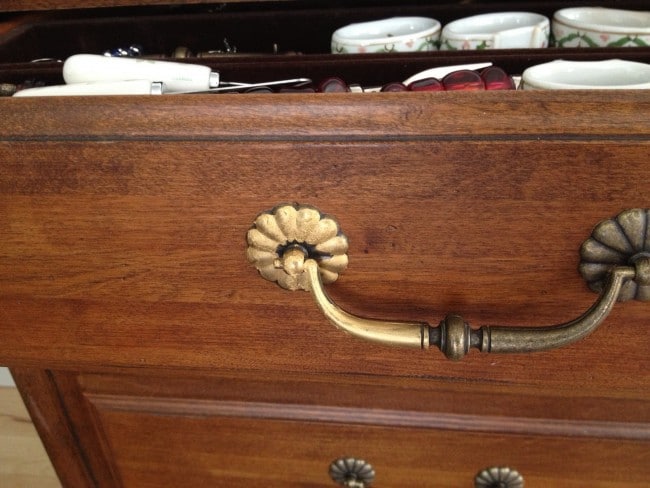
Out came the tube and next thing I knew, five minutes later, my dresser had a little more bling!
GAH! FIVE MINUTES, people! I’ve stared at this dresser for FOUR YEARS wishing it was different, but knowing paint wasn’t the solution. I’m slow but once I get going, watch out!
Do you ever have an epiphany when it comes to a makeover idea? A moment where you realize maybe a solution was easier than you thought? This Rub n’ Buff stuff is AWESOME!
Love love love how easy this was, it could transform SO MANY THINGS! I love how the gold hardware gives a little shine, and I especially love how it relates to the gallery wall, which you can see below (I’ve added it now that it is finished!)
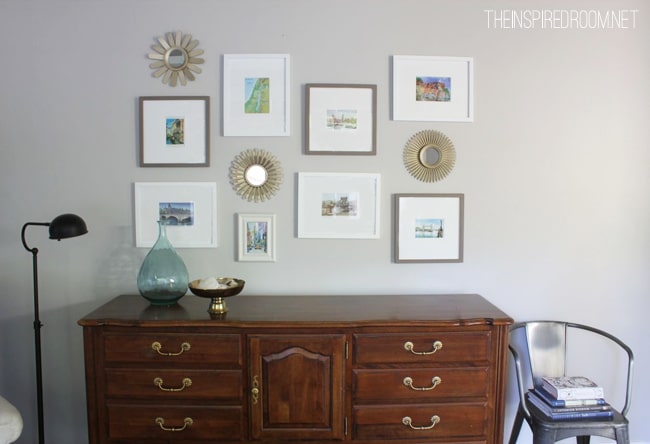
You can see the post on the gallery wall here!
Rub n’ Buff Hardware Instructions:
Open the tube.
Put Rub N’ Buff on your finger.
Smear it carefully on the hardware.
Buff with an old teeshirt.
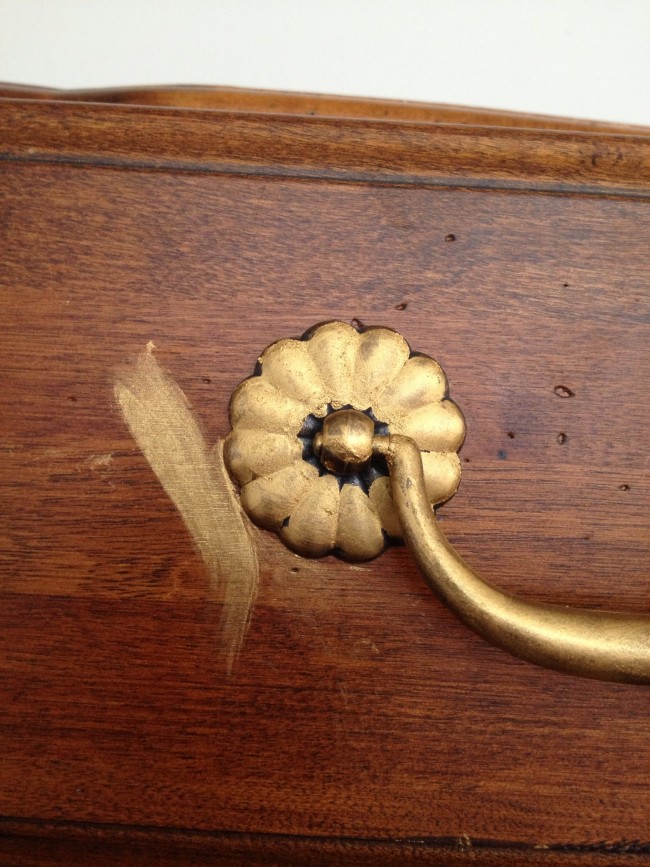
Note: If you decide not to remove your hardware first, take care to avoid getting the Rub n’ Buff ON the furniture. It came off fairly easily with a little scraping, but best to avoid that step altogether, just in case. Hehehe. #DIYfail

This is not the end of the “gold makeover”… come see the gallery wall with the pretty gold sunburst mirrors!
Want to try a gold project of your own, or did you join us for this challenge?
Once a month ten very different bloggers are hosting this challenge to recreate in our own homes a project or design element inspired by a haute couture design. The idea is to inspire everyone to incorporate fine design elements into your own home in a way that fits your own style.

Go check out the Ditto posts from these bloggers!
Darlene @ Fieldstone Hill Design
Ruth @ Living Well Spending Less
Cindy @ Skip to My Lou
Jen @ Balancing Beauty & Bedlam
Edie @ Life in Grace
Rachel @ Surviving the Stores
Karin @ Trophy Mom Diaries
Lauren @ I am THAT Lady
Kelly @ View Along The Way
Melissa @ The Inspired Room
This month’s theme is Go for the GOLD, and this was our inspiration photograph:
{Art and design by Samantha Reitmayer Sano of Style/Swoon.}
The {ditto} DIY Challenge:
Gild something, or paint it gold!
And now comes the fun part! It is time to link up your own fabulous Go for the GOLD projects and join the {ditto} DIY party! It wouldn’t be much of a party if you didn’t stick around, so be sure to check out as many projects as you can! Then be sure to visit Darlene’s site for a peek at next month’s challenge along with some expert design tips on incorporating gold accents into your home. (HINT: This design challenge could very well use something that is just sitting in your closet, and turn it into gorgeous art work for your walls!)
Come link up your own DIY Ditto Gold Project!
Enjoy the party!! Have you ever used Rub n’ Buff?


I love the way that you spent very little time to update an already beautiful piece! Great idea!
Beautiful! That just upped the dresser a huge notch! I painted my buffet handles gold; it worked great, but I have always wanted to use rub n buff; totally doing that next time!
Yeah, it was easier than I imagined! So fun too!
This is exactly what I needed! It certainly made a big difference in your piece of furniture. Great job! I too have brass from long ago…I kept it thinking it would “come around” (plus it is too darn expensive to change all of that out.) But, I keep looking at the light fixture above my head in my bedroom. It is “cheap brass.” Do you think that tube of gold magic would work on the rim of an overhead light? The old antiqued look is sooo much better than cheap new brass.
Yes, cheap brass could totally benefit from this stuff, I couldn’t believe what a difference it made and it is so easy! Try it and see!
I love the transformation Melissa! I am intrigued by the rub & buff…..it may be time for (yet another) trip to the craft store. Can’t wait to see how the gallery wall pulls it all together!
Those looks GREAT!! I would never have thought to go back to gold with hardware since I’ve been so busy painting all my gold hardware but the Rub and Buff gives it such a deep, rich look and five minutes? Love that!
Jen, you’re behind. We are on to GOLD now so don’t cover it up with silver or you’ll be left behind! haha :-)
Love the gold handles! I had an epiphany yesterday when I came up with a simple solution to a long-term problem. It wasn’t about a DIY project, but rather a bedskirt. This was my Facebook status yesterday. Maybe it will help someone else, too!
I just came up with a solution to a problem I’ve had for YEARS! Our mattress must weigh about 1,000 pounds and our dog loves to mark my bedskirt, so I have to wash it fairly frequently, requiring two hulky guys to lift the mattress for me while I struggle with that skirt. Well, I just cut the whole middle out of the skirt, leaving about 12″ to tuck in all around. Why didn’t I think of that before??? I just put it back on all by my lonesome (hulky guys are getting more and more scarce around here every year!) and it was EASY!!! Yay for simple solutions.
I’m a bit of a metal mixer myself! I’m really loving gold right now too. It’s such a classic, elegant look.
I am a huge fan of Rub n Buff. I have been using it for years.
Cynthia
Oh, Rub n’ Buff. I call it Rub n’ BFF. Fantastic stuff!
Haha, that’s funny but I can see how it might become my BFF too!
I love that gold is coming back! It adds warmth, coziness and charm:)
Thanks for the party! Love your hardware makeover! I linked up my Rub ‘N Buff hardware makeover too!
Jenna @ Rain on a Tin Roof
I had no idea there was a tube that could make things metallic colors or I would’ve used that instead of what I ended up using!! How awesome is that!
And there’s a silver one for me and Jen! :)
So fun, and easy! I’m all about the quick easy projects! :-) I also have a dresser that needs a little love….mostly the handles. But I’m thinking some pretty metallic handles, and some nice drawer liners could be a great quick and easy solution! Thanks for sharing! I’m off to take your home tour. ~Beth
Wow! I can’t believe what a difference that made! Hmm….what do I have that needs a “gold” makeover?
I know, I was pretty surprised too! Who knew it needed gold handles to spruce it up?
This fun party totally inspired me to finish my summer mantel makeover and another gold project I’d been planning — so thanks! And btw, the gold rub ‘n buff played a part in my project too!! Love that stuff :)
Awesome, can’t wait to see! Thanks!
Thanks so much for using AMACO’s Rub ‘n Buff! We love following all of the great transformations. We do have a Facebook page if you’d like to follow along – Rub ‘n Buff Metallic Finishes – with lots of great ideas for other types of transformations. And we have about 17 colors to choose from. You can find them all on our website. Thanks again!
LOVE the way the hardware pops off the dresser now! I have a tube of that stuff too and once you start using it, it’s almost impossible to stop! :)
This looks great! I love that it only took five minutes :) and I can’t wait to see the gallery wall later. {I’m also very excited that we used the exact same product! My link is #54.}
I can’t believe what a big difference it made! It looks brighter and fresher and now I need to find something to rub n’ buff (I feel like that sounds inappropriate, but you know what I mean right?)
I can’t believe the difference a little rub n’ buff always makes! Nice job!! :)