
This Post May Contain Affiliate Links. Please Read Our Disclosure Policy here
You’ve seen him around here before, and over at his blog. The big news is that I’ve invited Remodeling Guy to “join the team” at The Inspired Room! (Wait, can you have a team with only two people?).
Inviting him to “join the team” is a fancy-pants way of saying he has some fabulous ideas that I think you’ll all love…so, I am going to have him share his remodeling genius around here now and then.
I’m not going anywhere (um, except for Blissdom), but having Tim’s point of view here will fill in for those moments when I’m staring at a blank screen with nothing to say. That doesn’t happen very often (my husband is nodding in agreement right now), but you know what I mean!
So, WELCOME TIM!
…
Are you looking for an idea that will give your room character and style, while hopefully being simple and not too expensive?
Here’s a thought: turn things inside out!

Use Exterior Wall Finishes Inside
Think about the cool restaurant you like to hang out in. How often do you see an interior mock-up of an exterior look? Sometimes they go to extremes and build roofs and put in street lamps, but you don’t have to go that far.
Doing something really simple, like using lap siding (see photo above) on an interior wall can completely transform your room in a single day. You can start nailing up siding on a wall in the morning and have the job totally complete by nightfall. It’s that simple.
Trim Windows and Doors With Exterior Materials
I love the look of windows above, but that is probably the result of a room addition… that wall probably actually was outside at some point. Even if you don’t actually have a window, you could created the look of one with shutters (closed) and some exterior style trim.

Let’s play a little mind trick. Do you see that window above? What if what you see in the glass was actually behind you? Can’t you imagine that window with mirrors in it rather than clear glass? Or maybe stained glass.
The real selling point comes by faithfully recreating the exterior details. Use hinges even if your false window doesn’t open. use 1×6 lumber for baseboard and install cornerboards in the corners. Maybe even bang-up the wood a little to make it look more authentic.
Consider The Background
Some interior siding treatments have a more rustic look that allows for gaps between the boards. If you choose something like that, make sure you remember to paint the wall a dark color first. I did something similar in my sons room once. Even with tiny gaps, I was able to see the race car wallpaper border through the cracks! Take a look at this:

Isn’t that beautiful? I’d love to sleep in this space, though I might need to move the bed to the center. My 6’2″ frame might not work so well around the edge!
Remember: to create a great looking accent wall (or even a whole room) that has character, ease, and isn’t so expensive: turn things inside out.
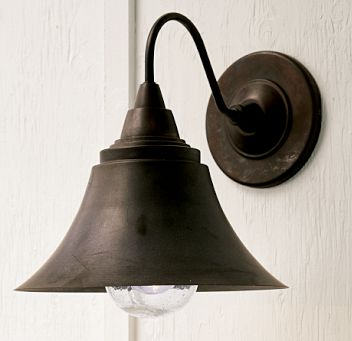
All images (except top one from Pottery Barn): www.CoastalLiving.com
32 Comments
Trackbacks/Pingbacks
- Inspiration: Transom Windows & Painted Wood Walls - [...] enjoyed Tim’s post last week about exterior elements being used as interior walls. Such a great way to bring…
Submit a Comment


Thank you so much for the introduction to Tim! Great ideas!
I wish I had an attic space to work with like the last photo. I love everything about that room! :)
~Kim
.-= Kim @ Everything Etsy´s last blog ..Oops! Button Problems – Get Your Fix! =-.
These are gorgeous!!! I have always wanted to try something like this! Especially the first picture. Wow! We are moving in the next two months. I’ll talk to my future husband and see if “we” have the courage to try one of these finishes. Thanks, Tim!
.-= Mary Joy´s last blog ..Day 2 of our $25 Walmart Gift Card Valentine GiveAway…Focus on our kids =-.
WOW…these are beautiful photos.
I want to sleep there too…
Thanks for the great ideas!!!
.-= Stephaine @ Geezees´s last blog ..Geezees Census, Who are you people? And a bit about me =-.
Great ideas, and I look forward to reading Tim’s ideas with yours! Our old house is in a constant state of remodel – it was built in 1908 and we have lived here for 26 years, so we are even remodeling our own remodels!
.-= Laurie´s last blog ..Lint and Dust Bunnies, Oh My! =-.
Cool ideas! Thanks!!
.-= Vee´s last blog ..In Search of Built-In Beds =-.
I love attic rooms with sloped ceilings and horizontal planks on the walls! Twin beds are so trendy now, aren’t they? I love the low trunk in between, and the pale blue of those blankets — my new, favorite color!
Love that last picture, what a great guest space that would make!
.-= gina´s last blog ..a peek at our week(end) =-.
I love the idea of using a mirror behind a window on the wall. I have wanted to put a window frame on one of my walls and I haven’t found the right one just yet…AND I need to let more light in (my house faces north and I have the hardest time getting light in!). When I find the right frame, you can bet I’ll try the mirror trick! : )
.-= Heathahlee´s last blog ..Please Stand By… =-.
I’ve been wanting to do a look like the last picture….what type of wood should I use?
Thanks for the tips.
.-= teresa´s last blog ..Sweet note….. =-.
Hi Teresa! (good to talk to you again!) That picture is just 1×10’s or so. They most likely used a pretty cheap grade to keep from getting baords that were TOO straight! They haven’t started charging more for messed-up lumber yet, so that’s good. Usually, the crooked edges of the boards create the gaps naturally, so you can really just butt them up together… usually! Depends on the wood. But you can use pretty much any plain lumber. If the edges are too straight and you want a little gap, use paint stir sticks for spacers as you install the wood!
I took another look at that picture… they actually used mixed widths, some are 1×10’s others are even wider. Looks like some up to as much as 14″ or more. To get that exact look, you might have to go directly to a sawmill. But a very similar look can be made by using a mix of 1×8’s, 1×10’s, and 1×12’s which are all readily available at you local supplier.
LOVE this…and welcome to Tim!
.-= the BLAH BLAH BLAHger´s last blog ..Front Loader Problem and Solution! =-.
More great ideas! Love it!
.-= shannon´s last blog ..Truth Be Told =-.
Hi Everyone!
Thrilled to be here and thanks for the warm welcome! If you ever have any questions for me, feel free to ask in the comments.
.-= Remodeling Guy´s last blog ..Check Out My Post @ The Inspired Room =-.
Great tips and ideas — especially about painting the wall behind a panel that has spaces between the boards. Thanks! And so glad you’ll be doing more regular posts.
.-= Lesley @ TheDesignFile´s last blog ..Etsy pick: Chic baby bedding to dress up a nursery =-.
Love these ideas! Our home was built in 1912 and somewhere along the line, one of the owners closed in the back porch to make it a laundry room – so by default we actually have one wall that is the old siding of the house… and I have always loved that feature of the room!
Yeah, Love the idea of the room ! Thanks for the useful info
.-= Kevin´s last blog ..Trái tim người dũng sĩ =-.
Oh my, You do know how to pick a great TEAM!!! he is the best!! Go all of his creative genes from…well, ME!!!
Blessings,
Pat
That would be GOT!!! I tried to catch it but, too late :)
Oh well, this is a CREATIVE blog…does creating words count??
.-= Pat Layton´s last blog ..Are you a Mac or a PC?? =-.
What a great addition to your edition!! Tim is creative, talented, etc. the two of you will make a great team!
ok please don’t think I’m crazy buuutttttt what do you think about using something like a t111 for a floor. I’m not sure of the exact name but I asked the guy at Lowes and he said “ya sure” . What do you think? It comes in large sheets 4×8 and is meant for outside. I would be painting it. It’s also not going to be in a high traffic area just a bedroom. It gives me the look I was looking for without costing a fortune but don’t want to do anything stupid! Help and Thank you
Hi Donna… you’re crazy! Noooo, just kidding. The thing with T1-11 is that it has deep grooves that would be a problem on a floor. They do make a few “wood alternatives” both on the more expensive and the less expensive side, that have shallow, wider grooves, but still grooves. I don’t really think any would work for a floor. If you really want a deep groove, you could use v-joint (I have a post on my blog about that now, for walls and ceilings).
I just don’t think you’d be happy with any of these options because a floor needs to be relatively smooth to be able to clean it. You could just buy some plain 1-by material, put the pieces next to one another, and paint it all really well. That might accomplish what you want. What do you think? Would that work?
First of all Thank you so much for answering so quickly! I was probably wrong in telling you it was t111 because you’re right that has deep grooves and the one I want doesn’t. What is 1 by? I have no clue. I was going to be able to get the floor done for about 300 dawlas! Its fairly large 14×19. Needless to say I’m on a REALLY tight budget and all I have is plywood right now. Yikes and you’re right I’m sort of crazy about clean. Just ask my very hairy very much loved Golden!
PS my daughter just sent the picture we took of the tag. It says 4×8 abtco knotty barnside unprimed. Thanks
If it’s smooth enough for you, then most wood will work. The issues with flooring are hardness (will it dent when you walk or roll a chair), texture (is it smooth enough to work as a floor, accept a finish, and be cleaned), and the thickness of the top layer (for plywood) could matter. If that’s too thin, it could wear right through.
It sounds to me like you’re talking about a sheet of decent exterior grade plywood that you like the look of. If so, yes, it will work for your floor. You’ll probably need to screw it down and counter-sink your screws a little so you can cover them with your choice of filler.
Good luck!
Thank you so much! You guys are awesome. I just came back from your site and hope you don’t mind but I will lurk you often! HA! You have a beautiful family as well! Thanks again
.-= donna´s last blog ..Parents Guilty in Teenage Son’s Death =-.
umm thats not my last blog. I have no idea where that came from
This is exactly the kind of thing I’m looking for. We’re remodeling and adding onto our lake camphouse out of necessity. It was damaged in a storm so we figured ‘might as well’. We added an upstairs with open faux rafters. This means a 20′ wall that I’ve got to cover. I want to make it look like it used to be an exterior wall. The problem is the cost. We’ve discussed using 1/4″ plywood with lathe strips but I’m afraid that with the wall being so big it will only accentuate it. I would love to do a faux lap siding out of 1/4″ plywood and for that matter any plywood scraps we have laying around. Then maybe faux aging them, then clear finish it to make it easier to clean.
My husband thinks I’m crazy. Have you ever heard of anyone doing this?
These are some beautiful ideas! We’re currently working on some shiplap in our kitchen, and I’m so inspired to put a mirrored window in our tiny bathroom!
LOVE these ideas–Tim’s & comments ;) I have an enclosed front porch cum office with the original exterior brick wall & 42″ wide window plus french door double windows on the 3 now-outer walls. Only interrupted by a steel entry door :) and I have gone thru every idea! But I think I have finally settled on the exterior kinda v-groove to do my thermal break on those 3 “real”outside walls. Ducted for heat & AC only does so much,so his summer the lath goes up with PL2000 then “pink” vinylwrapped (am allergic) in 1″, urethane the heck out the panels with a sprayr outside&finally fit. Oops, running extra junction boxes & conduit for future in/out wiring while at it. Tim do you “think pink” or shud I go really ez and just use that styro stuff? I thought pink be better R value cuz ont be redone in my lifetime. Only new windows someday (8 skinnies). Help.