This Post May Contain Affiliate Links. Please Read Our Disclosure Policy here
Update and add charm to a kitchen on a budget
A
re you ready to update your kitchen? Do you want to add charm and personality but aren’t sure where to start? Creating ambience is the key to having a truly beautiful home.
You know how you can look at some magazines and see a perfectly decorated room — but it seems to be missing something? That is often because it is missing ambience, that little ingredient that makes a room feel special, warm, personal or inviting. While you can add ambience through accessories, you can also do it directly through the architecture of your home.
NOTE: You can see some of the BEFORE photos of this kitchen here. It is QUITE shocking how far this kitchen was able to come on a reasonable budget!

The most charming homes have personality even when all the belongings are removed from the home! We can’t always change the architecture but sometimes we can fool the eye into thinking the house has more exciting architecture than it does.

Some of you might remember that I updated my kitchen in my old house. I wish wish wish I had better pictures to show you of my old house, but since we no longer live here, I have to make do with what I’ve got!
Today I’m going to show you how I turned my dream kitchen into reality on a reasonable budget!
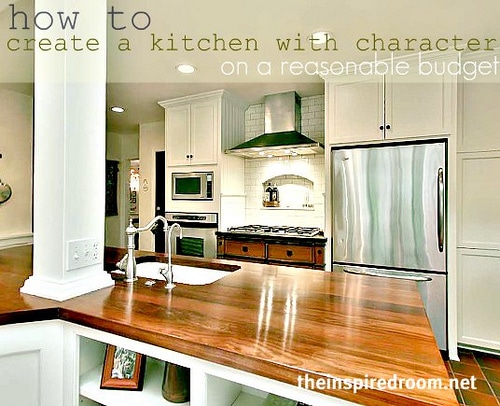
In an unfortunate decision, the previous owners decided to take this lovely English style home and give it a 1970s kitchen. So my challenge was to take an outdated 1970s style room and change it back into a more English style kitchen. I couldn’t rip everything out and I had to work with the original layout as a cost saving measure.
I wanted to squeeze as much affordable personality as I could into this kitchen so I thought and dreamed about every little detail until my head hurt! Let me take you on a somewhat blurry tour of our kitchen remodel and I’ll show you some of the things I did to give it extra personality without necessarily spending extra money.

Introducing my sink. I wanted an apron front farmhouse style sink, but that was a little spendy. So I got basically the same sized sink, but created an apron front with inset cabinetry to save a little bit of money that I could spend elsewhere in the room. You can see in the next photo (below) that this trick gives a similar feel without actually being a farmhouse sink. And, it has its own unique personality because of the recessed cabinet.

Now, go back up to the photo of the sink for a moment. See the cutout design in the wood around the sink? That is what I call a happy accident. The curvy shape of the wood around the sink is the shape that gets cut into wood before it is rounded into a curve. I liked that shape so much I asked my contractor to keep it that way. Result? Unique PERSONALITY at no extra cost.

And as long as we are looking at the sink, I wanted faucets with personality too. I needed new faucets, so searched and searched until I found the look I was after. We also mixed up our counter tops, using soapstone and Brazilian Cherry. The soapstone is fabulous, I loved it! We simply used mineral oil once a month to keep its beauty!
The Brazilian Cherry wood counter was hand crafted by our contractor. It was not cheap, but it was not as expensive as granite, and it gave the warm homey old world feeling we were hoping for! It has no stain, that is the natural color after you seal it. The sealer we used is called Aqua Spar. You can find out all the FAQ about the wood counters here!


Ok, now you can see the brackets we put in under the counter. Our contractor found some perfectly acceptable brackets, but they just weren’t special enough for this highly visible part of the kitchen. My husband and I went to one of my favorite stores in Portland, Rejuvenation, and found just what we were looking for at an affordable price…curvy ones that made me smile every time I looked at them.
Also, you can see we made the ends of the island (under the counter) have a different look than the end of other cabinets in the room (see the beadboard ends a few photos down.) No extra cost, just extra thought!

Another thing I really wanted in my kitchen was something to make it feel more like a living space than just a utilitarian kitchen. And nothing feels more homey than books, so I was insistent on a bookshelf! We built this bookcase in the small leftover space behind the sink and dishwasher.

While we were at it, I wanted a space to display colorful decorative items to show more personality. This set of shelves went in between banks of cabinets, where before there was just a blank wall. And to really pump up the detail, we added beadboard to the back of the shelves and brackets that mirrored the ones on our front porch.
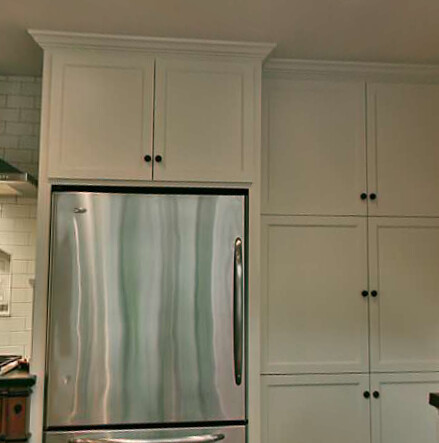
For many of the cabinets we used the existing sturdy cabinet boxes and just got new doors. This was a huge cost savings without sacrificing the look! And to give the cabinets more personality and a custom look, we used crown molding around the tops.
The paint on the cabinets is a gorgeous Antique White, perfect for an older home or one in which you want a more creamy color than bright white.
The full sized refrigerator got a built in look without the built-in (cabinet depth) price by bumping it out into the garage so it wouldn’t stick out so much into the kitchen.

I love this particular corner of the room because I can see a lot of the detail in one spot. Instead of using the same look for the sides of all the cabinets, we mixed things up. Several cabinets ends were covered with beadboard. Actually, to be even more unique, instead of the front side of beadboard, we used the BACK of beadboard, which is basically v-groove panels. We also added glass to one bank of cabinets, to mix up the cabinetry as well.
I would have loved to tile my whole kitchen with subway tile, but I picked a couple of key walls and went part way up the wall with it. It made me feel like I had a subway tiled room!
We also used a variety of hardware. We chose four different styles of hammered black iron knobs — square ones, round ones, bin style pulls and hanging pulls…all for variety. And then on the glass cabinets, we used glass knobs. It didn’t cost any extra money to mix things up, but it really impacted the personality of the room.

This cabinet with four working drawers was built to hold our stove — as well as pots and pans. We could have made it look just like our other cabinets, but again, I was all about adding the personality of a room designed over time. So we designed this little cabinet to look like an old piece of furniture.
The bamboo detail on this cabinet is real bamboo–cut and burned to give it character. The bamboo was just glued on top of the cabinet. And for just a little more personality, we put a little hook on each side for potholders. It didn’t really cost more than a regular cabinet, it just took a little more creativity to give it its own unique look.

This picture was staged for a holiday newspaper article, but I wanted to show you the niche above the stove. This feature did add a little extra to our budget but we felt it was worth it as it created a real focal point around the stove. Creating a focal point is a great way to add personality.
Notice that we used a darker grout with our buttery yellow subway tile. That was to tie in the existing rusty colored tile floor. I saved money by keeping the tile floors and making the rest of the room work with them, rather than against them.

Lastly, I used several colors of leftover yellow and green paint smudged onto my walls with a rag in order to give my plaster walls a really rich old look. The walls were not in perfect condition, so this technique made it look that the imperfections were a beautiful result of age, rather than something that needed to be “fixed.” I saved a ton of money on plaster repair and the walls became one of my favorite features of the room.
Our whole kitchen was a give and take of trying to make the most of our budget with as many touches of personality as we could. When we wanted to splurge on something, we found a way to cut back on something else without sacrificing the look.
So, fast forward to today and we have a brand new house. My wheels are already spinning as to how I can add in some more architectural personality and unique features to make it feel like ME. I do miss my old kitchen, but I’m dreaming about all the possibilities in my new home…someday!
UPDATE! My new house kitchen has been remodeled!! Come see how it turned out in my KITCHEN REVEAL POST!
Some of the before photos from this English Tudor house can be seen here.
111 Comments
Trackbacks/Pingbacks
- A Before & After: Extreme Room Makeover - [...] you missed my kitchen redo, click here. Or if you want to read the story of the house, click…
- Shutters: Easy Architectural Detail - [...] Need more ideas for adding architectural detail? Click here! [...]
- Do you have a maid? And other Q & A’s about open shelving - [...] counters and back splashes and add new knobs and glass doors to my open shelves (oh how I miss…
- 4 Simple Steps to Creating the Home You Want {Timeless Advice} - [...] miss my old kitchen. And my [...]
Submit a Comment
![]()
![]()


Melissa-that kitchen is absolutely stunning! I’m wondering about the countertop- what is it? was it easy to keep clean? did it cost a lot…comparing it to other materials like stone? did you end up painting the cabinetry (you mentioned replacing the doors). how hard is it to replace solid door fronts with glass?
Astrids inspiring blog post..Trim Options
This post will be shared with the carpenter today. I love all the details that you thought of to make a unique and beautiful room, particularly the sink feature and the variety of hardware. How’s the new kitchen coming? I would have to ask!
Vees inspiring blog post..The Power of Suggestion
It is gorgeous! I do not have the stomach or time to maintain those counters – very jealous! Be well, The Hostess
Blushing Hostesss inspiring blog post..Newport musings: Part 1
I hope the new residents love your kitchen as much as you did. :) I can’t wait to see what you come up with in your new kitchen.
Tara @ Feels like homes inspiring blog post..Grace’s Kitchen Friends – Healthy Potato Chips
Thanks for sharing. I love the open cabinets and all the different textures. Way to go.
Kaseys inspiring blog post..There is Love
What a great makeover! I can’t wait to see what is in store for your new kitchen.
SoBella Creationss inspiring blog post..Chalkydoodles
how lovely. i’ve been trying to decide what put on my backs plashes and subway tile is one of my choices. this helped seal the deal. i love the look.
thanks for sharing.
merryheart2
Sandras inspiring blog post..oh yes, it’s true: i’m here and i scrapped!
Oh, wow, you did a beautiful job. I love everything about it! And you came up with some really creative solutions, like the “faux farmhouse sink.” Thanks for sharing! :-)
Julia @ Hooked on Housess inspiring blog post..What 5 Changes Would You Make to This Old House?
Wow, some of your choices are pure brilliance! I love the way you mimicked an apron sink! And I love all the mix-it-ups you did! It is so gorgeous! I know you miss it, but OH, do show us your new digs, please!!! Loved the tour, thanks so much!
Suzanne
suzannes inspiring blog post..Psalm 19
What an awesome kitchen!! We are doing much the same…working with what we have. We just added crown molding and beadboard over the weekend and will have the cabinets painted this week! I love the idea of mixing hardward…I’m shoppping for that today! The sinks and counters will be next……
Jennifers inspiring blog post..He Really Gets Me!
Absolutely GORGEOUS! Can’t wait to see what you come up with in your new house!
Wow that is just beautiful. Love the countertops and all the woodwork trim you did. I bet it was hard to walk away from that special kitchen. But you know we can’t wait to see what you are up to in the new one.
Staceys inspiring blog post..So Crazy Around Here!
Wow that is stunning! We did a kitchen remodel in the fall on a shoestring budget. I love how it turned out – are there before pictures somewhere as well?
Melissa, I loved your old kitchen! All of these tips are marvelous. MY favorite was bumping out the wall into the garage to accomodate your refirgerator! Very, very clever!!
Hugs,
Penny
Your counter tops are to die for! And sometimes at night, I dream of subway tile : ) I don’t know how you could part with that kitchen after all the work involved in the remodel. Couldn’t your husband just come back and visit every now and then?
I am dying to put knobs in my kitchen, but my husband is choking on the 3 different styles I have found. I can never find them on sale! Good luck with the new place and dig deep to make it look old and well used.
~Misti
Misti @ Studio M Designss inspiring blog post..My Special Valentine
Love your kitchen. We are about to begin building our home and I am taking many ideas from you!!
Queen Bs inspiring blog post..Perspective
Wonderful ideas~ an idea for everyone! Beautiful kitchen! Can’t wait to see your new one. :-)
Your kitchen is gorgeous! Where did you get your wood counters? Did you stain them yourselves? If so, what color stain is it?
darlenes inspiring blog post..30 Top Romantic Movies
Absolutely gorgeous! I am sure you hated to leave it! I can’t wait to see what you do with the new place.
Lazy Mom Leslies inspiring blog post..A Place for Everything
Thanks everyone! I’ll try to answer some of the questions here:
The wood counters are Brazilian Cherry. I do not think they were as expensive as granite, but we selected them for the beauty and warmth they added to the room. We hand picked the wood ourselves to find the richest color we could. We did not stain them, we just had a clear finish on it protect it…like the wood on a boat!
Putting on a new finish every few years is all you have to do, and to do that you just buff with steel wool, clean off counters and apply a layer of finish. We only did that once in three years. It isn’t hard to maintain on a daily basis either, we just used placemats or coasters for drinks. Kind of like how you would treat a real wood dining room table. We LOVED our counters.
The cabinetry was all painted inside and out. The color is Antique White mixed by Benjamin Moore from a Sherwin Williams sample. We put on new doors to old cabinetry boxes wherever possible, however, the entire island and all the drawers were brand new with heavy duty hardware.
Some of the before photos are here: https://theinspiredroom.net/my-house/
I love it when you use “real life” pictures of your home- there’s just something sweet and personal about doing that. Your kitchen was amazing, can’t wait to see what you do with your new home.
Have a wonderful day-
Teresa
Absolutely beautiful. I just love your kitchen. Kitchens are by far my favorite room in a house. I love the ways you put your own touch in the space!
Kristens inspiring blog post..Time to Settle In
Girl, you did a saweeet job on the kitchen! I’m looking for brackets for my counters and the bottom of the upper cabinets. I also like the look of having the backsplash (I think we’re doing beadboard) and the upper cabinets being the same color. It seems to give the room a more cohesive feel. Super post. Thanks for the continuing inspiration!
Pretty Organizers inspiring blog post..Tying Yourself Down to a Schedule
I have loved every picture that you have ever shown of either of your homes.
I am most looking forward to ideas on how to inexpensively add charm to a builder’s grade basic home.
Beautiful artistic touches throughout! So much ambiance! And fun to see what you created … great details.
Gorgeous kitchen! I found almost the exact brackets to use for some open shelving in the kitchen remodel we did one year ago. Got mine on ebay and the seller worked closely with me on a semi-custom design. I love your ideas for the faux apron-front sink! Wish I would have seen this a year ago. :) Thanks for all of the great ideas, and keep them coming!
Shannans inspiring blog post..I feel sorry for boys.
Soo many good ideas. I LOVE that kitchen “accident” and the Farmhouse sink illusion. I cannot wait to redo the kitchen… but that is down the road. sigh. But I will shared my “Beautiful Life” bathroom:
http://worthwalkingtoward.blogspot.com/2009/02/before-and-after-bathroom-renovation.html
…I would love for you to see it!!
Great posts!
Darlene
Darlene@WorthWalkingTowards inspiring blog post..Do we have to Do anything to be saved?
Love what you did to your old kitchen Melissa. And I know the new one will be just as gorgeous. Can’t wait to see what you will do!
Dawn-Hydrangea Homes inspiring blog post..Furniture Makeover
what a great idea for the sink. I totally wanted a farmhouse style sink, but we were already way over budget. I am kicking myself now that I did not think of that great idea with the cabinet front. brilliant! maybe in the next kitchen :)
Courtney from Mommie Blogss inspiring blog post..valentine’s recap with my vow to be more domestic
LOVED This post about your kitchen. As I’m getting ready to remodel mine, I found all of your choices VERY informative. Thanks!
What a gorgeous kitchen!! I especially love the mix of items you used (the several different knob styles for example), and the sink was my favorite thing!! So pretty! I’m sure you’ll do an amazing job on your new kitchen as well!
Stacey @ The Blessed Nests inspiring blog post..I Won!!
Oh I love the mix of the dark wood and the white cabinetry. And the stove cabinet is fantastic. Definitely filing this in my “keep in mind for future home use”. It’s wonderful to see real photos of your home!
Heather Bullards inspiring blog post..Amour
Your kitchen and pics could be in a magazine. Isn’t it fun planning it all out. I have done 7 remodels and built 2 homes. It is exhausting but rewarding in the end. Good job!
Jeans inspiring blog post..Friend Makin’ Monday
Wow, this kitchen looks like one out of a magazine and is absolutely gorgeous! I love dark wood like you chose, but would never had considered it for the countertops. Did you find that the coating would get scratched in a busy household, or did it stand up well?
I love looking at other people’s special touches to their homes, but I myself am not very gifted in this area. I guess I just want it to come easily, and I can see you put a lot of thought and work into it. I love the results though!
Taylor at Household Management 101s inspiring blog post..Feb 14, Personal Finance Blogs I Recommend
Charm and personality! The kitchen is delightful. Every picture has an idea for me. I love the cabinet under the stove, it’s warm and felt like it had been around awhile.
I can’t wait to see what you’ll do in your new house!
~Robin
All Things Heart and Home
Robin Rane’ ~ All Things Heart & Homes inspiring blog post..All Things Crafty!
Great post, you did a fabulous job of using details to make the kitchen look like it had evolved over time. Love the subway tile. And those cherry counters are gorgeous.
I’m looking forward to your ideas for adding architectural style to a newer home, an issue I’m brainstorming about also.
Kimm at Reinventeds inspiring blog post..Containing Kid Clutter
Your kitchen is beautiful, I love the bookshelves and all the little details!
Melissas inspiring blog post..Valentine’s Day Dinner
Beautiful job! I love all the clean personality you were able to infuse. I wanted to offer a pointer: It pays to haunt Lowe’s and Home Depot: more people than you can imagine return special-order merchandise, and it can be had for a ridiculous discount. My mother got her dream sink for a third of the original cost!
Ambers inspiring blog post..Design: Love it! Updated Blu & White
just beautiful! i know you must miss that gorgeous kitchen but i’m sure you will have something just as brillantly mastered in your new one to come!
i enjoyed the stroll down “how to” lane…ambience is really the key! and details matter so much!
i can’t wait to see what you’re “thinking”!
cynthias inspiring blog post..for my friend Morgan
You did a wonderful job with the last kitchen. What great attention to detail! I love the materials you used, too!
You’re so creative and I’m sure you are going to make your new kitchen look amazing. You might need a little time in your new house to know exactly what that is, so don’t rush! :-)
-Kim
Kim @ Forever Wherevers inspiring blog post..Bringing Outside In!
Melissa- just curious- I just looked up Antique White on Sherwin Williams (I have a bunch of paint chips!) and it seems darker (more like beige) on my paint chip than it does looking at your photos. I really love how your kitchen looks with those painted cabinets.
Here’s something I’ve always wondered- if you paint the kitchen cabs do you run the risk of them being sticky? I remember a friend painted her dark cabs (from the 70s) to a light pink and the drawers always seemed to stick. Just curious if this is because the wrong kind of paint was used or something else.
Astrids inspiring blog post..Trim Options
Hey there! That was one superb kitchen redo, hats off to you. I know it’s hard to move away from something that you had your hands on & I had to do that too. I’m in the process (and posted today) of adding some picture molding below the chairrail in our DR & then one of my next projects will be changing out the countertops & adding a few more details to the kitchen. Can’t wait! It IS those little details that make such a difference & sometimes it’s not all that expensive to do it. Have a great week!
Rhoda@Southern Hospitalitys inspiring blog post..The black architectural piece has landed
On the paint color, in my kitchen the antique white formula is a very lovely creamy white. I will have to look up the formula from Benjamin Moore because I had mine custom mixed (I like Benjamin Moore paint quality).
It is definitely not beige so you’d be better off going with my formula than the name just in case they changed their name or formula at Sherwin Williams. I’ll find it and post it here as soon as I can.
I think I’ll do a paint post because I have some favorite paint colors I could share! Of course, you can’t always take someone’s favorite paint color and put it in your own house and get the same result. Lighting and other items in the room can change it dramatically.
With regards to painting dark cabinets, PREP work is the key. All the beams in my kitchen were dark stained wood but we did TONS of sanding and many layers of a good quality primer before painting. Cabinets are trickier to get a good finish, that is why we had new doors made and also new drawers with high quality gliders so they’d open and shut really well. I didn’t want any sticky ones!
That is a great kitchen! It’s beautiful.
Kim~HomeIsWhereTheHeartIss inspiring blog post..~*A Craft & More Red*~
Pretty much one of my favorite posts EVER! LOVE it! I cannot wait to see what you do with your new canvas, I mean kitchen. Wish I could go live in that nook over your stove.
The Nesters inspiring blog post..10 Minutes to a Room You’ll Love:: Part 4: The Kitchen
Character is truly in the little things and you’ve done that so well here! I especially love the “accidental” curved detail on the edges around the top of your sink :)
Katys inspiring blog post..Studio/Office Inspiration
I am so very INSPIRED by this post. It is refreshing to see that much beauty can be created at little cost. My favorite detail is the countertop at the sink. What a nice touch–and such personality. Thank you for reminding us that beauty is within reach–it just takes some creativity!
Wow…you have a classy kitchen! Very impressive and deluxe. Thank you for the lovely photos! Anita
Let me try this again…you have a very sophisticated blog site! I love it. I am new so I am just getting the hang of this. Thank you for the great photos and inspiration! Anita
What a great room , Meliss…your new kitchen will look just as great. I think whenever you move you always feel likt it’s the kitchen that has to show “home”–it’s where the heart is!
Taras inspiring blog post..Ina Garten’s Fave Bakery in The Hamptons
this was beautiful and inspirational! I can’t wait to have our own home so I can add a bit more of me to it.
Mois inspiring blog post..Quote
LOVE the new door idea. That would save so much money keeping the original cabinet frames!
Hi Melissa,
That kitchen is beautiful! I love the wood counters! Great ideas and I’m sure you’ll come up with plenty more for the new place!
Tim
Remodeling Guys inspiring blog post..This is For The Birds!
Stunning! I can see my kitchen while I’m sitting here typing, and already I’ve got some changes in mind. Thanks again for the inspiration!
Deidras inspiring blog post..Happy Valentine’s Day!
Oh to be the blessed person to buy your old home. Just beautiful! I cant wait to see what personal touches you put on your new home. The “thinking” stage is always the hard part. Once you make that first move the rest always seems to just flow~
Melissa, that kitchen is absolutely stunning! I could sit and look at pictures of it all day long. Very pleasing to the eye! Some new owner is going to be very lucky. Hey, we’ve been having sunshine in Portland!
Sheryl
This kitchen is so incredibly beautiful! I really like the counter with the brackets. We have something similar in our house and I really need to find some bar stools.
What a divine kitchen. I just savoured this post as I am finalising my kitchen cabinetry as we speak. Your posts never cease to delight me. I just drink them in! A-M xx
After seeing this, I can’t wait to see what you do in your new kitchen. Your old kitchen was a dream! laurie
Wow! Great post! I have it bookmarked for later.
I was wondering if you could post a rough layout of your old kitchen. We plan to gut our 70’s kitchen in the future and we have a post like yours that I’d like to integrate somehow.
Can’t wait to see what you do with your new kitchen!
I lurked around you at Blissdom09 but never got to spend any time with you. Just wanted to say HI, your kitchen is my dream kitchen and I hope to get to hang out with you at the next meeting.
You are officially on my blog stalking list.
http://whitetrashmom.com/2009/02/blissdom09-michellelamar.html
Oh your kitchen was beautiful! I can’t wait to see what you do in your new house. Have a great day!
Whenever I have caught glimpses of your old kitchen in your other photos, I have hoped you’d give us a full tour. This is so beautiful, Melissa – what a labor of love! I bet you miss it but I know you’ll make your new kitchen just as fabulous.
That is one gorgeous kitchen!! Love the idea for the apron sink. That was genius. totally.
Still Learnings inspiring blog post..Bye Bye Garage
I have gleaned so many ideas from this post! Our kitchen at the lake needs to be redone so badly…you can see it here: http://robinsblessednest.blogspot.com/2009/01/2008-project-party-repost-of-houseful.html. We are waiting until we can remove the walls between the kitchen and den to open everything up, so I am collecting ideas until then. Some of your ideas will definitely be added to my collection! Congratulations on your new home…after seeing the photos of your last home, I can’t wait to see what you do with it!
Robins inspiring blog post..Is It Spring Yet? Sure Seems Like It Here!
Thanks for the tour, Melissa! Beautiful and inspiring!
Hope you have a great week!
Shilos inspiring blog post..Mon Amour – Part Duex
I always loved the kitchen in your former home Melissa. Absolutely beautiful. We’re looking for brackets and a couple of architectural type pieces to gussy up the kitchen and front door at home!
Pats inspiring blog post..~The Island Project~
You are so brave. I would have been so afraid to get an unattractive hodgepodge-look. I wouldn’t have thought that 4 types of hardware and cabinetry could come together so beautifully. It’s gorgeous and I love it. Can hardly wait to see your present kitchen all done up.
I know your new kitchen will look just as good as your old one..You have such a great eye for detail, love this sink tip and the book shelf idea… love
LuLu
LuLus inspiring blog post..Madly, Deeply, Crazy For Slipcovers….
I’m just a little in love with your old kitchen….SIGH…..
Liz@VioletPosys inspiring blog post..Facebook Change of Terms and Conditions
Love the details you’ve shared that you incorporated into your kitchen redo. I wish you would speak to the table and chairs in one of the photos above. Did you paint that yourself?? Details would be wonderful; I love it.
Everything you have share with us is just beautiful …. I could look at your photos (and read your suggestions) for hours and hours!!!!
Helens inspiring blog post..Not Blue Man!! Man … It’s Blue Cat!!
Lest you think I can’t spell or speak proper English …. it’s ‘shared.’
Helens inspiring blog post..Not Blue Man!! Man … It’s Blue Cat!!
I love the cabinets in your old home. It does take a while to add your own personality to a new home, to make it yours. But I love that part, it is fun to start with a fresh canvas!
Beckys inspiring blog post..Bittersweet
This is a stunning kitchen. Love all the little extras (at no cost). It does have such personality and big style too. Just lovely! Great detail photos too. Great selections.
This is a fabulous post – THANK YOU for sharing! So many lovely ideas. . .
abbys inspiring blog post..The ‘best’ french onion soup recipe. . .
I have moved forward with my kitchen redo! Thanks for the inspiration and I posted a link to you today on my blog! Everyone should see what you can do!
Jennifers inspiring blog post..Fully Exposed
Proof that a few details go a long way in the appearance of a room. These photos are particularly impressive. Especially if they can be had at a reasonable price.
Gennaros inspiring blog post..Free Entertainment In Las Vegas
Congratulations on your new home! Can’t wait to see what you do. And love the pics of the old kitchen.. it’s so pretty!
xx Trina
ps- I still have not figured out how to change my header size for your blog roll link…I think I better put it on my list to figure out :)
Trina McNeillys inspiring blog post..Loving Labels . . .
I love your kitchen! Its so warm and so gorgeous. Thank you for sharing!
Alisons inspiring blog post..Wordless Wednesday
Wow, I’m in awe. Your kitchen is truly remarkable, and I love reading about the thought process that went into it all. I can’t wait to see what you do with your new kitchen.
AnNicole@OurSuburbanCottages inspiring blog post..MY FAVE FIVE
Gorgeous! Gorgeous! Gorgeous!!!!! Love all of the little details that you added. Lots of character! All I can say is “WOW!!”
Enjoy it!!
LOVE your kitchen – thank you so much for all the great ideas. I thought I’d share that we did, which is very similar, tho lacks many of your unique touches. We are starting from scratch (on a very tight budget) with a nearly 200 yo simple brick farmhouse, a two year old and newborn baby. We also used freestanding furniture, soapstone (LOVE IT) and butcher block, tongue n groove, subway tiles and upper cabs made to look like a breakfront. Our uppers n fridge combo were to disguise that the full size fridge sits into a wall built out from our brick one.
All of this was truly done on the cheap/off the shelf and nothing was custom except some cabinet fronts my hubby built to match where our sizes were odd. Our farm style/apron sink came off Ebay. After much research we learned that IKea cabinets were top rated (LOVE THEM) and bought butcher block n barstools there too. We painted our cabs cream. Three years later, with a 5 yo and 2 yo and farm dirt/critters, it all still looks great!
You can see some pics on my hubbys website jldecks.com
We are in the process of measuring and getting quotes on cabinet doors and drawer fronts. Do you mind telling me where you got yours? This is the exact style I’m looking for!
Beautiful kitchen. I love your mix and match style. I will be doing a kitchen remodel in the fall. Does it bother you not to have counters adjacent to the stove?
Sorry. I realize these are from your former home. Also, how well did the cherry countertops hold up? It doesn’t look like you put a heavy “marine” varnish on them.
Answers to some questions about the kitchen:
If you have a lack of counter space next to your stove, as we did, you can use a rolling cart or pull up a small table to hold supplies when you are doing some serious cooking and then just put it away when you don’t need it.
The counters have a finish on it called Aqua Spar. It was easy to apply. It protects the finish and ours held up well–even with lots of teenagers and small children using the kitchen. We only reapplied the Aqua Spar one time a couple of years after we remodeled just to freshen up the surface.
To renew the wood surface, you can either add another layer of Aqua Spar or if you want to smooth out any imperfections, simply buff the surface with steel wool, clean it off really well and then apply the Aqua Spar. Easy! We loved the counters. Our new kitchen has granite and we’d go back to the wood in a heartbeat!
LOVE your kitchen redo, I have saved the link for when I move into my next house. Thanks for all your lessons in saving money and not scrimpting on style! I love the solutions you came up with for your kitchen! …and your house!
Mary Ruths inspiring blog post..Craigslist mirror FIND!
Your kitchen is A.maz.ing!!! I love the sink……well…everything!
Robins inspiring blog post..Snowy Days….Skating Days
Don’t know if you’ll see comments on an old post like this, but thought I’d tell you… thanks for the idea of glass knobs on glassfront cabinets! I did some “budget-friendly ” renovating of my kitchen 2 yrs ago, stripping old wallpaper, putting in the subway tile backsplash, adding bright white beadboard halfway up walls and on the existing white cabinet ends, painting the rest of the walls soft white (sometimes looks very very pale yellow). One must was changing 3 cabinets to glassfront and adding a corner glassfront…all in one block…then changing cabinet pulls to 2varieties of black (round and pull). The black pulls always seemed jarring to me on the glass fronts but I didn’t think I could mix in something like glass knobs without looking mismatched. But I tried it this week after remembering your suggestion here, and I am LOVING it! It makes it look a bit more like a hutch look — that English look you were going for is my dream too (as much as I can afford to do anyway). I think I would have fallen in love with your old kitchen! Thanks again for the glass knob idea! Every time I come into my white kitchen it is so light and airy it just makes me feel God’s joy… like puffy white clouds. (My contractor/painter made me laugh when he said “it feels like heaven in here” as he painted the varying shades of white. (The living room off the kitchen is a pretty colonial blue, so I wanted mostly white with blue accents in my kitchen)
Had I viewed this post before I had my kitchen redone, I’d have implemented a few of your inspirational tips. This post IMO ought to be in a magazine spread.
I so know how it feels to finally get things the way you love and have to leave them. Kudos, it’s not easy. I left a dreamhome built to an 1800’s floor plan with a full wrap around veranda on 5 acres only to move into what we call a BC box, after my divorce. I’m still trying to fall in love with it. Sigh…
Making things your own takes time, but I’m extremely curious to watch the coastal transformation I just know is ahead! Taking notes taking notes taking notes… :)
Donna
Donna at Funky Junk Interiorss inspiring blog post..Spotlight on an amazingly unique office makeover
So inspiring! You mention a future article on nonpermanent architectural details for renters. Has that been posted yet?
Thanks for reminding me about the post I was going to write…I got sidetracked with moving and haven’t done it yet! I’ll get back to it as soon as I can!
The cabinet under the cooktop is an interesting detail … it has the immediate first impression of a freestanding range, but keeping the ovens in a tall cabinet offers convenience while cooking.
Adrienne @ Susan Palmer Designss inspiring blog post..Before & After Photos … The “After” Pictures are Here!
You are amazing. Seriously. Thanks for the counseling session tonight. :)
I love the contrast between the wood countertops and the white cabinetry. Lovely!
We are beginning our kitchen remodel and I’ve been seriously attracted to these European cabinets. What I’ve noticed is that the doors to all the cabinets appear to be smaller. Is is just deceiving because the doors don’t overlap, or did you find that the holes were smaller due to the design of the flush cabinets?
I love your kitchen round table and chairs-they look hand painted. Where did you get them from. Thanks! Love your kitchen!!
Gorgeous! I love what you did with it! And sometimes those little imperfections become so endearing to us. I feel that way about my crooked floor, it’s and old farmhouse, it needs something to be a little “off”. lol
Hugs!
Fi
Totally LOVE your kitchen….that is my dream kitchen!! If you don’t mind me asking, we live in Portland and I would love to get the name of the contractor you used for the renovation. Also, what neighborhood was your home in? I love the charm and character. :)
Dear Melissa, This kitchen of yours is history now, but for me it’s a REVELATION. At the suggestion of Coldwater Creek last fall, I (a blog scorner previously) took a look at you; the name “the inspired room” evoked the possibility that I’d discover some of my feelings about beauty, harmony, balance, character, and one’s family personality, and I certainly did. In our 32 years of married life we’ve done fairly well with expressing ourselves “handsomely” and personally (with a lot of inherited classic type furniture) in our several homes thru the years, but I/we were without knowledge of products in the marketplace and ways to use them, as you have done so well. Also, we don’t like to work too hard! We’ve got no budget for home improvement these days, but you’ve made it seem possible to do some things here and there, one at a time, without a huge investment. Specifically, adding subway tile in a spot, beadboard here, a shot of stained glass there. ~ Our vintage 1873 and not necessarily high-end home in New England lacks a decent entryway. Well, there’s a front door, but who uses that? No, to enter, one must pass narrowly by the garbage cans and snow blower on the side porch, make it through the coat closet, both without lighting, to the kitchen. Architect and big money needed to correct that issue–but because the kitchen is where everything ends up means there’s a lot going on in that room. I’m thinking that Antique White paint everywhere, wrought iron cabinet hardware, and using faux-architectural accents on the infrastructure could have a calming and unifying effect, not to mention an upgrade in terms of handsomeness, beauty, and character. Your Behr All in One Studio Taupe for the walls could be a classic and serene answer to this kitchen’s issues. All of the preceding information about us was to establish where I’m coming from in order to respectfully suggest that a PRINT command on your website would be very helpful: My dear husband won’t sit and browse through blogs on the computer but will read print-outs. It would be nice if the images and paragraphs and pages printed without awkward breaks. I printed “DIY door casings” from a cozy nest this morning, and there was a dedicated print function; so pleasing!–and that covers that. ~ I’ve also been pleased to find your link to the marble formica countertops from the lettered cottage, and I so loved the Sad-to-Awesome project. I think you Melissa are quite awesome! I don’t know how you do all you do. But I’m glad you do it! My, there’s a world of amazingly imaginative, competent, and strong women out there; I appreciate the Internet’s giving me a connection to them. My feelings about beauty, spatial balance, etc., have been closely held, but here on the computer there’s you with the same feelings–thus I share with you. Over and out–Louise
An oops!–make that “Charming Nest,” not cozy.
Louise
Your kitchen looks great do you happen to remember the brand of faucets, sprayer, and filter spout you have and where you got them?
Thanks Rhonda! Here’s a post with all the sources from my kitchen: https://theinspiredroom.net/2013/04/08/kitchen-remodel-ideas-sources/
I love these kitchen ideas! We remodeled our kitchen last year, but I still felt there was something missing even though my kitchen is brightly painted and airy. I spend a lot of time in my kitchen. I love to cook! The missing piece was windows. My kitchen and dining room area had small windows. So this year, when going over my pro choices – I opted for a custom-order “bow window” (the kitchen sink area) overlooking my beautiful home garden. Plus, I added sliding glass doors with fixed windows to my dining room area. Now my vision is complete1