This Post May Contain Affiliate Links. Please Read Our Disclosure Policy here

This Fall Garage Enhancement project was in partnership with the The Home Depot*
Do you have a space in your house to organize your tools for home projects this Fall and Winter? Every Fall I tell myself the same thing. Self? You should clear out space in the garage and organize your home project tools before winter. But then I ignore myself EVERY year and don’t do it. And then I regret it all winter. But this time, I was determined to get my act together and stop procrastinating.
I was SO tired of risking life and limb to climb over stuff in our garage all winter to get to our fancy tool box (a.k.a. a cardboard box.) Honestly, who keeps their tools in a CARDBOARD BOX? SO embarrassing and inefficient.
I really wanted to get my WHOLE garage organized this summer, but since it was already September (and I was heading out of town for half the month) I lowered my expectations just a bit to at least organizing ONE CORNER. :-) I figured if we could at least get our tool area organized and functional I would enjoy my winter projects so much more this year.
So my daughter and I paid a visit to our local Home Depot in Poulsbo one evening last week in search of a simple solution to organize the tools.
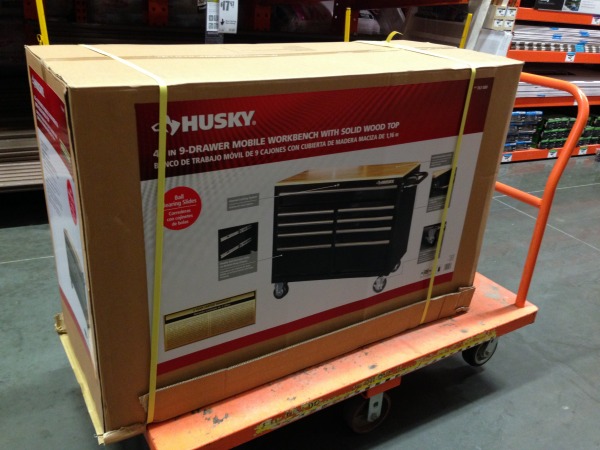
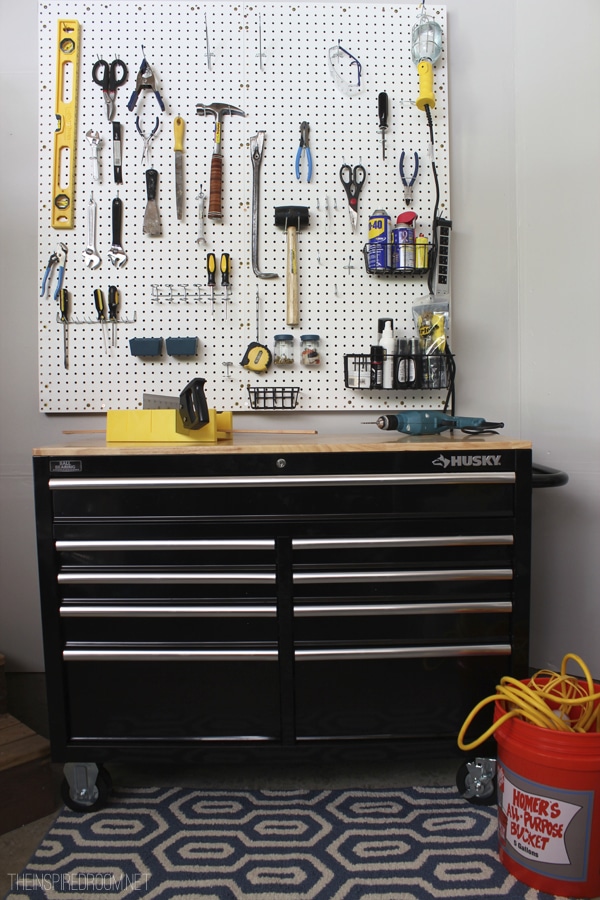
The employees at The Home Depot were SO helpful. I described what I had in mind and they helped point us to this workbench. I loved that it had a beautiful wood top, industrial wheels, and drawers where we could store things. I also really liked that it was moveable, because once I clean out the whole garage (someday) I may decide to rearrange things a bit so it would give me flexibility in where it could be located.
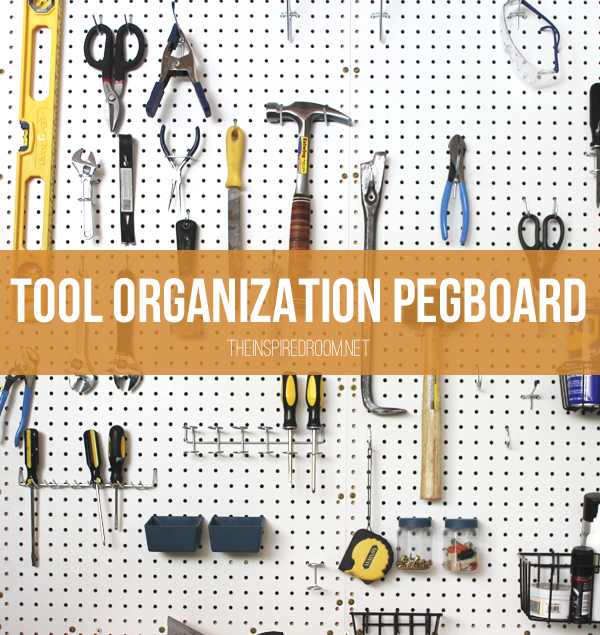
The other thing I really wanted in this area was a large pegboard. I’ve always dreamed of having a pegboard with tools on it so I talked to an employee at The Home Depot about how I could make one. The next thing I knew he was offering to help me make a pegboard right there at the store. SCORE! He was SO awesome! And no, he did not know I was going to write about him or this project. Double score!
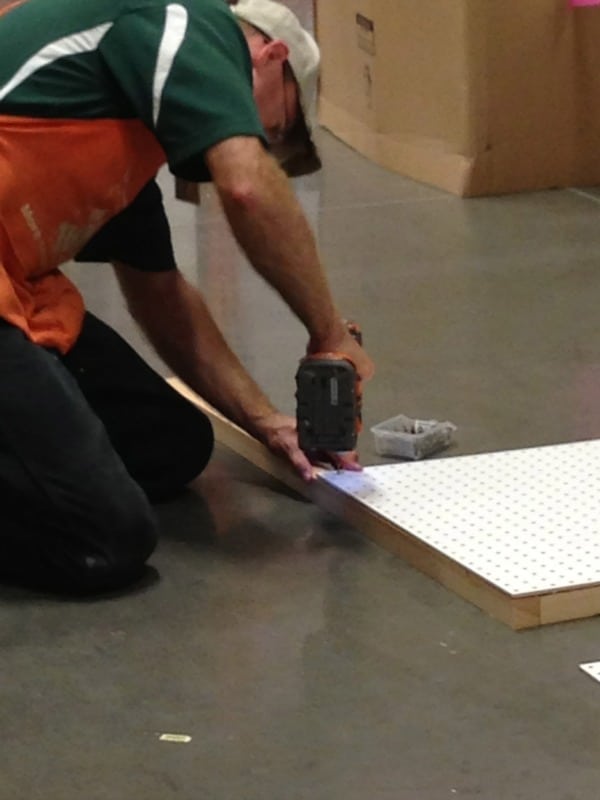
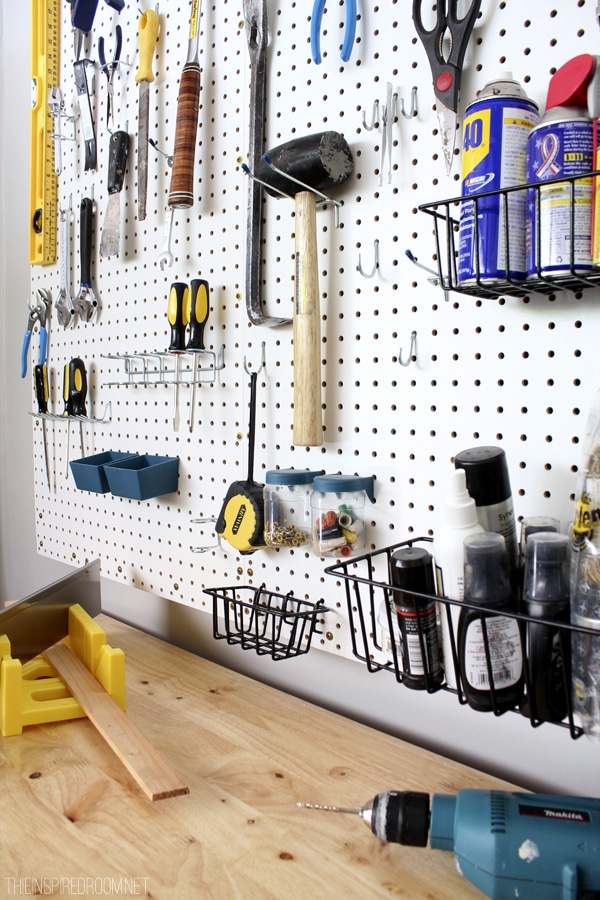
I wanted the pegboard to be pretty big, so I picked out two sections of white pegboard so it would be in total four foot by four foot. In order for the hooks to hang properly on the pegboard, it needs to be mounted a little bit out from the wall so a frame was built out of wood and the pegboard was screwed into the frame.
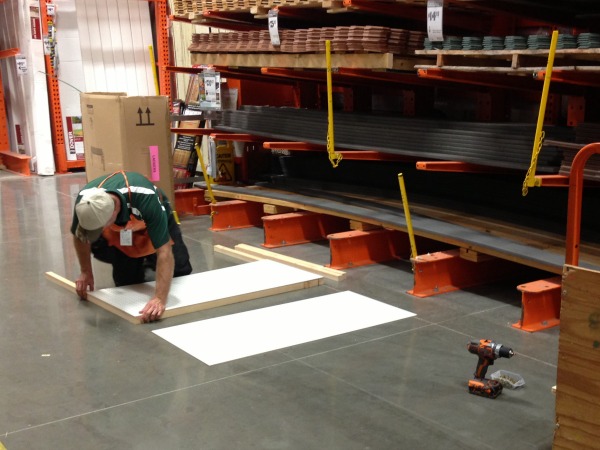
Instead of creating two smaller boards, they were joined together in the middle to make one large one.
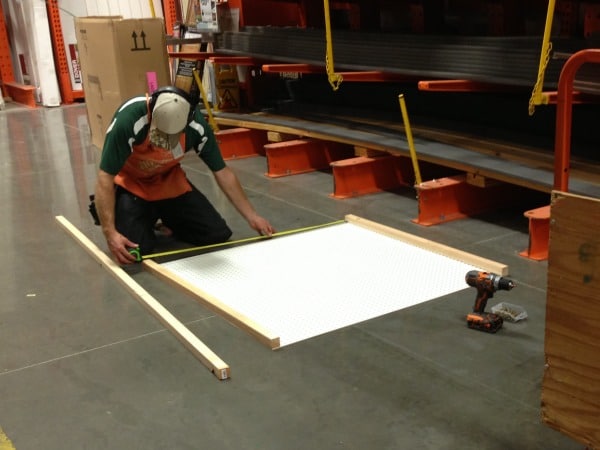
The pegboard turned out beautifully. He even used fancy gold screws so it looks so nice! I was really pleased with how it turned out. Originally I was thinking about painting the pegboard with some sort of checkerboard or striped pattern, but when I saw how nice it looked white with the gold screws I decided I was happy with it as is.
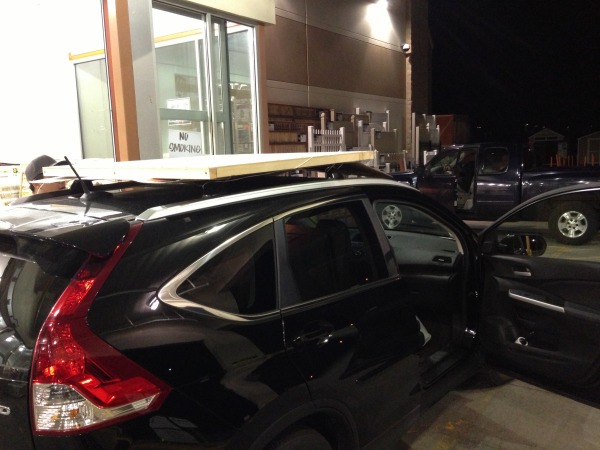
When it was time to load up the tool bench and peg board into my car just before the store was closing, it became evident that pegboard wasn’t going to fit with the tool bench! Oops! But the ever resourceful crew got it all secured on my roof rack so I could get everything home in one evening. Driving home was a little scary haha, but it stayed on the roof the whole time.
To hang the pegboard in our garage, we located the studs on the wall, drilled holes, and then used three inch screws to go right through the pegboard into the studs so it would be nice and sturdy. Our garage floors weren’t really level but we did use a leveler for the pegboard so it would be hung straight.
For the organizing part we just bought a starter pegboard organizer kit that came with various hooks and accessories for hanging things. We will probably tweak the system as we start to use it. I’m hoping this system will also mean we lose less tools :-).
I’m SO excited to have this area looking so much better and more organized! And I’m pretty proud of myself for finally tackling a project I’ve wanted to do ever since we moved in.
The rest of our garage is still embarrassingly full of stuff, but at least we have one corner ready to go for Fall projects!
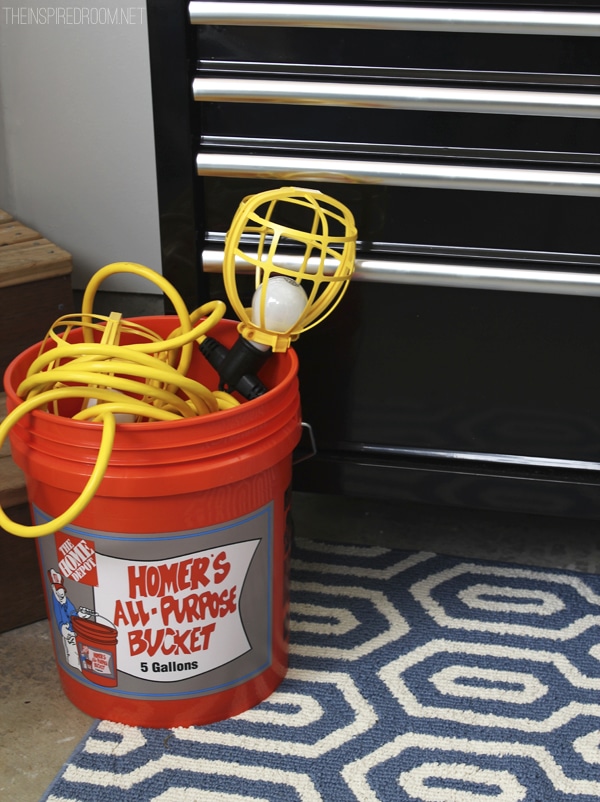
Oh, I also got this nifty string of yellow work lights that I could hang up for better lighting for my projects.
Every girl should have yellow string work lights in her garage, right?
So do you have an area where you organize tools for Fall and Winter projects?
31 Days of Fall Nesting:
31 Days of Fall Nesting:
Day One
Day Two
Day Three
Day Four
Day Five
Day Six
*I acknowledge that The Home Depot is partnering with me to participate in this Garage Enhancement Project. As a part of the Garage Enhancement Project, I am receiving compensation in the form of cash and gift cards, for the purpose of promoting this project and The Home Depot. All expressed opinions and experiences are my own words. My post complies with the Word Of Mouth Marketing Association (WOMMA) Ethics Code and applicable Federal Trade Commission guidelines.
14 Comments
Submit a Comment
![]()
![]()


Love it. My daddy has had a tool organization pegboard over his workbench for as long as I can remember (and I’m a grandmother!).
Wow ! I cannot believe he helped you put that together right there in the store! That must be a former boyfriend. Wink, wink – just kidding.
-Trish
Ha! More likely I looked dazed and confused and he was doing a good deed! :-)
This is so great! Now I know what to get my husband for Christmas. Thanks!
Gee whiz, I need Home Depot to partner with me since I visit once or twice Per Week! It is our typical date night destination, too :) Seriously, that tool area looks great!
I wish my townhouse had a garage to undertake a similar project here… As it stands, I’ve 3 tool boxes in my basement w/ inherited (heavier duty and well used tools) in them, and two mini plastic toolkits (w/ basics – small hammer, pliers, flat and phillips screwdrivers, measuring tape, some nails, screws, masking or electric tape, and picture hangers) on the 1st and 2nd flrs, so they’re immediately available for small “jobs”. Dad had a very well stocked garage and he always emphasized making it easy to do things (incl the end – putting away). That way, repairs, etc., weren’t as likely to be “put off.” He used old cigar boxes for different sized nails, screws, washers, etc., marked them (incl. size) on the end and stacked them alphabetically, so they were easy to find. (He got the boxes from the local drug store, where they saved empties for him.) He also used a peg board (like yours, but unpainted), outlining where tools’ “homes” – like Julia Child w/ her cookware – making putting away (and finding, later, for other jobs) a snap. So, once you establish your work patterns (most oft used tools nearer/easier to reach), you may want to consider that, too, as well organized tool centers are a “magnet” for family members to borrow from your stash, too. He drew the outlines in pencil, so if he wanted to move things around, it could be done easily. He marked masking tape w/ general contents and put that on each drawer front of his tool chest, putting “like” items (drills, etc.) together. Using the tape allowed him to rearrange easily as he got more (and more, and more) tools at yard sales!
PS – Really nice job! Bet you’re going to be surprised how handy those lights will be! About how long did it take to get the tools/supplies outta the box and up on the board?
I am loving the cute rug in the mix with tools and stuff. Just a touch of style. I can dig it.
http://hazelberrypaper.blogspot.com
http://www.etsy.com/shop/hazelberrypaper
I love the pegboard! And that’s awesome that they put it together for you right there. It looks like the perfect place to work. Since building a work bench in our garage last year, it’s become a much more usable project/work space, which we love.
I just started going thru the garage last week, and realized that the shelving units we put in 9 years ago were covering peg board the previous owner had installed, so I am planning on moving things around to expose the pegboard and create a workbench underneath it. I did organize and label the drawers of the tool chest, which has been a mess. The garage is unheated, so what I really need to work on is carving out a space in the basement so I can not use the excuse of it being too cold in the garage to work on small projects over the winter!
It looks terrific!! Oh how I would love to have everything together like that. Then again…I have a basket…duh!….that was designed as a caddy and I keep my tools in that. But…my sweet husband borrows from them because the location was so convenient. Arrgh. Oh well…I really can’t complain…except that he doesn’t return the goods. [wink] But…he’s such a good guy…I just roll with it.
The hammer in the center of your pegboard. That’s a really nice hammer. In fact…I have one just like it. And a great story to go along with it. Many years ago, my husband gave me that hammer (well, not that very one) for Christmas. I can’t tell you how disappointed I was to receive that lovely hammer. It came in a box that looked like the box a handcarved nuthatch perching on a tree stump of sorts would have fit into perfectly. And I was pretty sure I was going to get it for Christmas because I commented on it every time we walked by the wildlife art shop. And the deal was sealed for me when it no longer was in the window of the store. Merry Christmas me! So when I opened that box and saw a hammer….I had all I could do to fight back the tears. A few minutes later, my husband had another gift for me…a lovely hat and mitten set. It was perfect for my parka. He said to me, “Why don’t you try the hat on in the little bath.” So I slouched in there and looked in the mirror at my new knit hat. My husband followed me…and standing in the doorway he told me how good I looked in it and then he said, “Open the cabinet door.” And when I did…guess what was sitting in the cabinet? Yes…my sweet handcarved nuthatch. And yes…the tears finally came…but this time they were tears of joy. I love that hammer….and it is a constant reminder of my creative gift-giving guy. :) Thanks for the reminder, Melissa! :)
Wow! That guy should get an award or something! Talk about excellent customer service. Melissa, I really like how you decorated everything! I have been eying those Husky garage cabinets. What do you think of them? Do they dent easily? Oh, I love the rug you put in front of the workbench. :)
This project is awesome. I’ve been wanting to use pegboard all over the house (since I can’t help but keep tools in every room). I think you went with the right choice in keeping it white :)
Wow, that was so nice of the home depot guy! I am looking into workbenches and pegboard right now. My tools are a mess!