
This Post May Contain Affiliate Links. Please Read Our Disclosure Policy here

Easy DIY: Installing Faux Tin Ceiling Tiles as a Backsplash
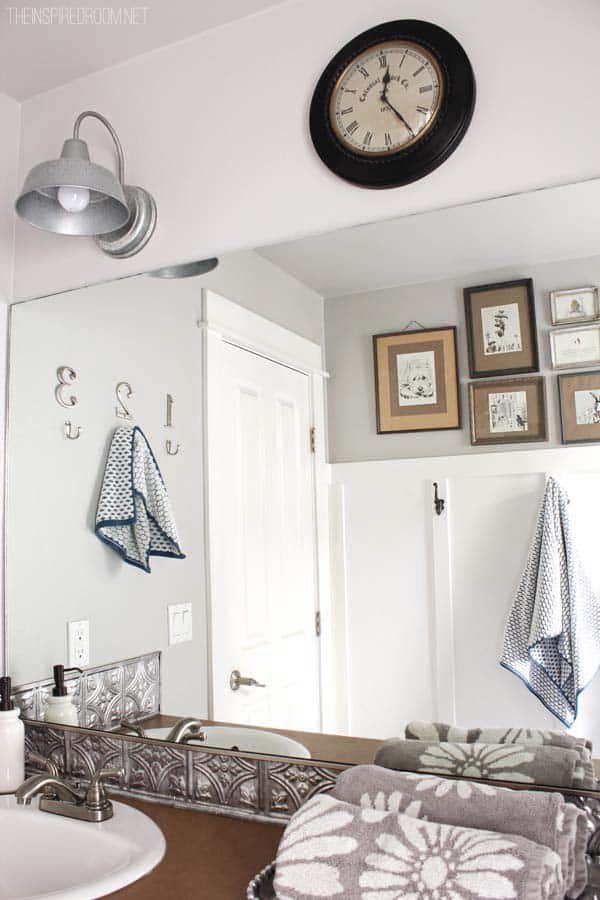
Greetings! I appreciated all your kind comments on my kids’ bathroom facelift and your overwhelming support of my little faux tin tile backsplash idea! Glad you liked it and shared it. If you missed it, you can find the bathroom makeover and all the explanations of what and why on that post.
As with any quick simple makeover, everything isn’t perfect.
But if I was going for perfect, I’d spend a fortune in time and money and that was not my intent with this project. There are things I might want to change down the road. But that is the beauty of a makeover like this. You can transform your space in a short amount of time relatively affordably all on your own without a lot of skill, tools or carpenter friends.
You can do this! If I can, you can.
Here is what you’ll need:

Let’s get started with the backsplash tutorial!

STEP 1:
Rip off existing back splash and metal trim.
Clean off remaining debris and dust from the wall and counter.
NOTE: I think you could probably install this right over the formica backsplash, except for the metal trim piece on the formica might be too bulky. You might find a way to do it, though.

STEP 2:
Measure the area for your backsplash and cut the faux tin squares according to the size you need.
You can cut it with sharp scissors.
The “cove molding” piece (that I used to bridge the tile and counter) and trim pieces (which cover the raw edges of the tiles) are a little more challenging to cut, so you’ll need really sharp scissors or a saw or something! You DIY gals probably have just the right cutting tool. We used regular scissors but my husband had to do it for me. I was a wimp.

STEP 3:
Tape the back of the tin tile with the double sided adhesive tape. Keep the paper on the tape until you are ready to stick the tile to the wall. I put tape on all edges of the tile and the cove molding piece to make sure it would stick well.

STEP 4:
You might not have to deal with this step like I did, but if you have a tight area, such as the small space between a standard builder mirror and your back splash, you might be able to tuck the tile a little bit under the existing mirror so there is no need to put any trim piece on the top part of the tin tile under the mirror.
It was a little tricky to squeeze the tiles in between the mirror and the counter while keeping the tile flat and in the lower cove molding trim piece. You just keep tweaking the tile size with scissors until it fits flush.
Helpful Hint: I would advise an extra set of hands for this step! It wasn’t hard to do, just tricky! If you don’t have to fit the tile in a tight squeeze, you won’t have to worry about this step at all.

This is what the trim piece looks like in case you are wondering what I’m talking about, it is leaning against the finished back splash where trim pieces are installed.
The trim is what you put around all the exposed edges, it fits on like those plastic report cover things we used to bind papers with in school? Hard to explain, sorry I didn’t take a photo of that step. I don’t have a photo of the cove molding piece, but you can see it in the photo above, as it was installed on the lower part of the back splash.

Step 5:
Lastly, you just remove the paper from the double sided tape and smash it to the wall. Hold it for a little bit to give it a chance to stick. The beauty of this is if you make a mistake, you just pull it off and try again. If you use the tape, it isn’t like super glue where it will pull the wall apart but it worked great for this installation.
I have no experience using the glue like adhesive, but I suspect if you were doing this on a bigger scale or on a ceiling, you might want to try the glue.
Putting this back splash together is just like doing a puzzle, you piece things together until they look finished. I didn’t worry too much about it all being perfect. If your tile pops away from the wall, just add some more tape.
This faux ceiling tile has been installed in this bathroom as a back splash now for almost a year. NOTHING has happened to it. It will be easy to remove when we want to change the counters and it could certainly be reinstalled if we wanted to.
Obviously, you would not want to install this product in your shower. Eh hem. But as a backsplash or on a wall or ceiling, yes. I was even thinking of using it in my cabinet doors as an insert! I also thought about painting my counter with a coordinating metal paint and sealing it well, but that will have to be for another day.
And here it is, the faux tin tile is still in the bathroom several years later! It has stood the test of time in a boy’s bathroom :-)! See the current update to the bathroom, here.

If you are looking for a way to do a simple makeover of a wall or back splash, I would say this is definitely worth the try! While this tile isn’t really “cheap,” when I compared it to the cost, hassle, mess, the need to hire help and “one thing leads to another” back splash options I considered, this is the one that made the most sense for me!
If you use this faux tin tile somewhere, I’d love to see a picture! Come share it maybe on my Facebook wall?
Have a great day!
More Bathroom Design Inspiration Posts:
Beautiful Bathroom Remodeling Ideas
Pretty & Functional Bathroom Storage Ideas
Lovely Bathroom Storage Solutions
Inspiration: Repurpose Furniture Into Bathroom Vanity
46 Comments
Submit a Comment


What a great idea! I’ve been looking for a way to spiff up our bathroom sink/mirror area, and this will do it!
wow – I had no idea it was so easy!
We used this in our kitchen, we really love it and always get compliments on it
And I should mention that it really was very easy to do. Thanks for sharing!
Love it….. I’ve used that tile for lots of different things….but never a back-splash-
Thanks for sharing
Terrific idea, Melissa. And I bet it wasn’t expensive to do. Plus when you get tired of it, it should come down easier than ceramic tile.
I have wanTed to try this on a ceiling but am way too chicken! You make it look easy, which I’m sure it’s not! It looks awesome!
Stacy
This is really charming…I have always loved the look of tin tiles on the ceiling, and I’ve seen it used in kitchen backsplashes as well. Thank you for the tutorial…maybe I could do something like this myself, but I am chicken around sharp edges…haha. I especially love the way you kinda made the formica “work” with the colors. Looks great!
Beautiful job!..I think I see a laundry room project in the future!..Thanks so much for the tutorial!!
This truly was a great idea and such an impressive trim for not lots of $$$. With young married children I know this idea will come in handy for them when they buy a fixer. Thank you for the details on how to do it.
Karen
I love this idea. I was thinking of somehow using it in my laundry room. Thanks for the tutorial!!
Melissa, thanks so much for writing me back. Double sided tape! This is so up my alley as a project!! I am a paper crafter (card maker) so this is just like what I know how to do, only on the wall. I’ve never been able to afford a backsplash in my 45 year old kitchen and now with these tiles, I will be able to have one. I’m going to paint my tiles and trim first, and then go to town. Thanks for sharing this great project!!
This is brilliant. I want to try this with my bathroom and kitchen too. What a good idea. I hope I can do it.
Ah, what a great idea! In fact, for renters like me, this adds a tough of glam AND can be rather easily removed, if needed.
oops…”touch” of glam. Clearly I need another cup of coffee!
great tutorial! thanks for the info!
Hey Melissa, I just sent the link to your bathroom makeover to my husband because I like the faux tin tile back splash, then came to Facebook and saw the tutorial. Now he has TWO link in his inbox. :-) Thanks!
Blessings.
Melissa,
Thanks for sharing! The finished product looks great, and looks really cool contrasted with the paint color in the room.
I work for ACP, the company that makes these backsplashes. For readers interested in product details, here’s a link to our web site:
http://backsplashideas.com/p/839/fasade-traditional-1-crosshatch-silver-kitchen-backsplash-panel
Jennifer
Thanks for sharing this! I really love the look and am strongly considering it for my master bathroom!
Thank you so much for posting this for us!!! I always thought that stuff was way outta my league. I am going to be doing it in my kitchen and bathroom!! Thanks again. I looooooooove your website, ideas, everything!!
Melissa this looks great, I think it would be fun in a kitchen also or even as a trim around a door or window, I did not know they had such a product. Thanks for the heads-up!! Kathysue
Love the tin. I’ve seen this un kitchens, and never thought about bathrooms…great idea. BTW…thanks for the door casing shout out!
-Erin
We just had our bathroom done last year. It was an extension. However, if we didn’t, this was something I’d use in a heart beat. It’s great, affordable and looks attractive.
Looks fabulous! Thanks for the tutorial.
Love it! (And, sure those school binder things that slide of the edge. Got it. What a quick idea for a finished project.)
I think we’ll probably find a way to use some faux pieces in our home. We’re expecting our steal piece to arrive tonight to be a backsplash for our stove. (Just 1 piece front and center as decoration.) Fingers-crossed it will arrive for our reveal. If not, we have a back-up plan.)
Your finished project looks so finished and coordinated.
You’d never guess it was done on a budget with speed and simplicity in mind. Nice job!
~ Dana
I love ceiling tins. I am thinking of using this idea for my kitchen. thanks. happy to have found your blog this morning.
I love this tutorial! This is clearly stated and the steps are easy to follow… I never have tried this back-splash.. Thanks for sharing the steps.
This is beautiful! It looks fabulous!
Great tutorial and it looks great! What a creative idea.
Melissa, hi, this is so wonderful. I have not seen this before, and I love the metal. I’m thinkin’ my kitchen! Wow I really like the change in the pictures you showed. Great job, looks easy…hmmmm….great tutorial!
Blessings,
Debbie
Melissa, you did a great job. i wish our home depot sold such cute tiles. God bless x
the best tool for cutting tin…. tin snips! we have an ancient pair, i think inherited from someone. anyway, they are great for cutting all kinds of things that are just a bit much for scissors.
Super job, and thank you for the tips. We are about to begin a similar project. Where do I find the trim molding? Thank you!
My first time on your blog and I love the tins for ideas. I’ve wanted to do something with our kitchen cupboards since we moved in. Our cupboards are the typical mfg. home pressed wood with contact paper on them and I really don’t like them. Painting them will be a nightmare. I wanted to cut out the center panels to put the glass in but that’s just too cost prohibitive for us so the tin tiles will be a good alternative. Thanks for great ideas. I’ll be back to your blog. I love decorating on a budget (budget, what budget? lol) with found and redone items.
If I want new pillows I go into my sewing room and dig in my stash for something I can use. Not always what I want but manage to find something pretty close and get busy with sewing machine. Sometimes I print out something and make a transfer to put on the pillow cover. Sorry this is too long.
Is it easy to clean?? Thinking of putting it in the kitchen?? Any thoughts?
Hi Melissa:
Just stumbled on your blog. Love, love, love the tin tile backsplash makeover in your kids’ bathroom. I do have a question about the trim. Is the trim piece metal or plastic/vinyl? Also, what did you do about the top raw edge of the faux tin tile after cutting it? I hope I’m explaining this correctly – I’m worried that the raw edge will look unfinished. Also I would love to use this in my on a budget kitchen makeover. I have shaker style light oak cabinets, thought about leaving the oak on the top and painting the bottom cabinets some sort of sage green, then using the faux tin tile as a backsplash. I would love to have new countertops – possibly white marble or a corian, but not sure if that is in the budget. I may have to settle for marble tiles (although I’m not wild about the grout.) My current backsplash runs from counter to the bottom of the upper cabinets, but wraps around the wall to finish it off. Not sure what to do about that – I don’t want it to look thrown together. Any comments on any of this rambling message? Thanks for your response – love the bathroom – the paint color is awesome! Melissa
I was sent your way by a fellow blogger, kickasswife. I see that this is an older post and am just loving what you did! Not only is this a fantastic idea, that I intend to steal and use in my downstairs bathroom (bright orange Formica counter), but I also dig how you shared a great tidbit again in a new post. I would have missed this if it was just in your archives!
Great, thanks! :-) Glad you found the post!
Great idea and beautiful installation! I’d like to use this product in my cabin, but have been unable to find it online at Home Depot. I’ve used search terms, “faux tin,” “faux metal,” “faux pressed metal,”faux tin tile,”faux pressed metal rolls,” etc., but can only come up with actual (and expensive) pressed tin tiles. You’re the second person I know of who bought this product at Home Depot, so I’m certain they carried it at one time. Can you give me a more specific title and/or manufacturer’s name to type in to the Home Depot search window? I’d be grateful. ~Deb
Well I don’t remember the name but I’ve seen it recently near their kitchen displays. I think I also saw it at Lowes. I’ll look the next time I’m there, maybe today, and let you know!
Thanks for posting this! Gives me inspiration for when we makeover our kitchen! Right now it is 80’s oak cupboards and ugly vinyl flooring and tiled counter. But it’s a big kitchen so I’m not really complaint. Your project will help keep costs down I hope..because we want to get the cabinets painted white, get new counters (and backsplash!) and new flooring. Hoping it won’t be too crazy expensive. Thanks again!
*complaining. Sorry for the typo!
Very Nice! I always look for something that I used on ceiling. Thanks a lot, for this superb idea. This is very easy to use, I used them on my kitchen ceilings.
Looks great! What did you do in the corner? How does it look? Do you just bump them to each other?
I am seeing this four years later. I wonder why the tiles behind the faucet are smaller than the ones used at the side?