
The most common words I hear from potential clients is: “I’m stuck.” Sound familiar? You know you want to surround yourself with beauty and feel that things are put together, but it is oftentimes overwhelming to know where to begin to create what we want. Let’s talk about how to get started, whether your room is indoors or outdoors, we can tackle them the same way.
WHERE TO BEGIN?
DEFINE THE SPACE
When I first begin work with a new client, I always sit down with them and ask a series of questions. One of the first topics we discuss is what the client intends to use the space for and what sorts of activities will take place in that room. Defining a specific purpose for your room, and even spaces within the room, really helps to zero in on some basic information that will be useful as you begin to design. You can apply this to indoor or outdoor room design. For outdoor rooms, even if you have no yard and only a front step to work with, a space can have a purpose! With a front door, it is a place to welcome guests as they knock on your door! It is “the welcoming space.” Just knowing that small piece of information can help you decide what to do with the space you have. From there you can design a “room” that will function and be aesthetically pleasing.
You can assign purposes several times over within a room. You might have a room that has to accommodate both eating and relaxing, for instance. So now that you have defined two purposes of the room, you can begin to create rooms within rooms. In both big or small spaces, every nook can be assigned a purpose. Dividing a room up by several purposes makes it much easier to design than if you just call a room a “living room,” for instance.
AN ILLUSTRATION
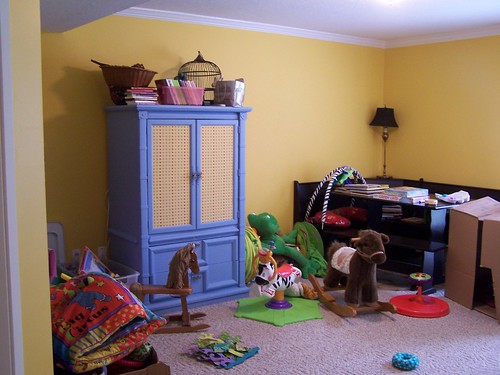
Below is a playroom of a client who called me with those common words, “I’m stuck.” She didn’t need any new furniture and her room was already cute, but she knew something was wrong because her kids didn’t want to play there. This is a big clue that something is wrong with your space. If you don’t want to go there, that signals a problem.
BEFORE: PLAYROOM
THE SOLUTION
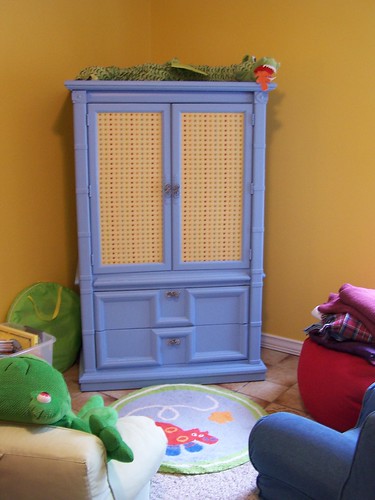
The problem was it simply wasn’t arranged with specific purposes in mind. Calling it “a playroom” was not specific enough. We needed to create zones, or rooms within the room. By simply creating two distinct spaces, I was able to create play zones that made sense for the kids. One area became the reading/TV nook, and the other was the “arts & crafts” zone. Each space you are designing needs to have a specific purpose so that you can know where to focus and how to solve the problems. In this case, it only required switching two pieces of furniture.
AFTER: READING/TV NOOK
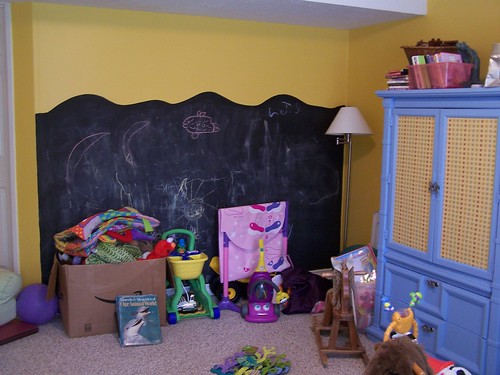
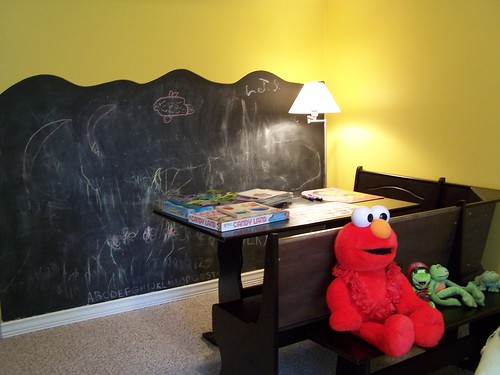
BEFORE: PLAYROOM; AFTER: ARTS & CRAFTS ZONE
By simply defining the room and spaces within a room, whether your room is inside or outside, you can start to envision spaces that serve a purpose, rather than just a big design dilemma.
Next posts in this series (which will at times address both indoor and outdoor rooms) we’ll talk about problem solving in room design and then start to discuss the specific components we need to create inviting rooms. TTFN!
Photos: Top “25 Beautiful Homes: September 2005” via House to Home website
Playroom photos: my personal design projects


Thanks for the wonderful design advice Melissa. I love that turquoise piece in the first photo!
Fabulous advice.
Love what you did with the room.
Thanks
Alison
Could you be any more fabulous?? :)
Melissa,
I really like the way that you break it down into manageable segments. It is much less overwhelming that way! I love how you broke the room up so that it could be used for multi-purposes! You come up with the greatest ideas. Someday you definitely need to put this all together in a book. You are so good at what you do.
Hugs and love,
Deb
I love this. You have such a great way of solving both organization and design dilemmas.
Thanks guys! :-)
I like to solve decorating problems in the most simple direct way. Usually the issues we have end up being not so much of a decorating problem as an organization or function problem. Once you address those issues, things usually look better and then it is easier to decorate. :-) I like small manageable chunks for my simple mind.
Thanks for the great advice, Melissa! And thanks for stopping by my blog, too – I’m a big fan of yours and check in daily :)
Andrea
Melissa
what is so neat about this piece you did is it helps especiallt when the room is larger…I find a larger size room daunting but even a large room can have separate spaces in it..seeing your exMPLE lets us see how it is done-thanks!
Tara
great tips coz i’ve got at least 2 rooms that need revamping and most of the time, i just done know where to start. anyway, i’ve got 2 awards for you, the E for this excellent blog is definitely well deserved , happy day and weekend :)
Well said, Melissa. Many times we get overwhelmed by a design problem, only to find that we need to start with basics first. Something so small as designating specific areas in a room–who knew? :)
Melissa,
I enjoy your blog so much. I don’t know that I could get through my design studies without fabulous and educational posts such as yours. Thank you!
Anna :)
Wonderful post, Melissa.
Spring has sprung in Missouri! We are so happy to see our gardens beginning to wake up! Time to do some work on our outdoor rooms.
Pat
What lucky kids. You can just see how this really “works”! I love that first picture…..sigh…..
I never thought about defining a room, yet it makes perfect sense. I think that by defining the purposes I can manage the idea of changing things around with more confidence. Thanks for stopping by today, and for your lovely comments. Karen
Thank you for that great advise!
This is what I love…the nuts and bolts practicality! Thank you!
Had to laugh reading that a good sign that a room isn’t working is if no one wants to go there. :>
Your clients must adore you – a wonderful eye and a spiritual approach.
Having you for a blogging friend is like having our own personal decorator/designer…..Many thanks for all your help!
hugs, bj
Great advice – I love before and afters!!
As always, you’ve given some great tips! And what a darling armoire your client has! I’ve got to do some reorganizing in my childrens’ rooms too! But I guess it must be a day for childrens’ room posts because I’ve got one of my kids rooms on today too!
This is great advice! I’m going to apply it to all of my spaces and define the purposes. Then I will have a much clearer idea of what needs to be done and will tackle the easiest first. Thanks!
I want that conservatory type room in the first photo. It is gorgeous. Thanks for the great tips.
Hugs
Rhondi
what an inspiring post! i love the play rooms….i am working on my girls rooms, and my boys rooms too…i wish we had a ‘play room’…but it keeps me on my toes trying to drum up ideas for storage and displaying their fun stuff/toys etc…
you are always so inspiring Melissa!!! thank you again and again!
hugs bff!
shelbi
very nice…love the first pic, i love the font on the wall
Finally updated my blog love list and added you – hope you don’t mind!
Wonderful advice. I love the before and after photo’s. And…that hutch! Love that color!
The photo of the sun room is spectacular. I could use a room like that just about now…full of sun and beauty.
so super cool! i LOVE your blog. i work at domino mag and have just started my own design blog, http://www.urbanfleadesign.com. i linked to your site, and would be forever indebted to you if you did the same for mine! in the meantime, keep up the awesome work and cheers!
xo Katherine aka. Urban Flea
Melissa – Such common sense solutions – this is really something we can all use – it’s easy to remember and apply and the results are practical and beautiful! Thanks for the great tips and the befores and afters – LOVE befores and afters!!!
Hugs and blessings,
Becky S.
We keep a big chalkboard in one of our playrooms too. Yes, I said “one of”. We alternate toys between the basement playroom and the 1st floor playroom. There’s way too many toys after 17 childhood years & counting. We thin them out and give them away but still I can’t stand the clutter. So… we keep the majority downstairs (where the young ones still won’t go alone) and just a few things upstairs (where I have to live and trip over everything). BUT I love your chalkboard WAY more!! Blessings… Polly
Hi Melissa!
What a wonderful post! You are not only a very talented designer, but you also explain and show things so well. That is not an easy thing to do!
:) Melissa
It’s amazing how much children respond to their environment. I think they (just like us grown-ups) get overwhelmed when there isn’t some sense of order. You did a great job defining the areas!
And that periwinkle armoire is A-DOR-ABLE!